
Here we’ll be covering the concept of WooCommerce attributes, how they’re useful for us, how we can set them up for our shop products, and add display these product attributes in our WooCommerce product tables.
What are WooCommerce product attributes and why are they important for us?
WooCommerce product attributes are properties you can add to products to describe them more clearly, such as color, size, material, or capacity. Once assigned to products, these attributes can be displayed on product pages for shoppers. You can create as many attributes as needed, and different products can use different sets of attributes.
WooCommerce product attributes become especially useful when combined with our product table plugin because they allow customers to compare, filter, and search products based on their properties.
Comparing products based on attributes
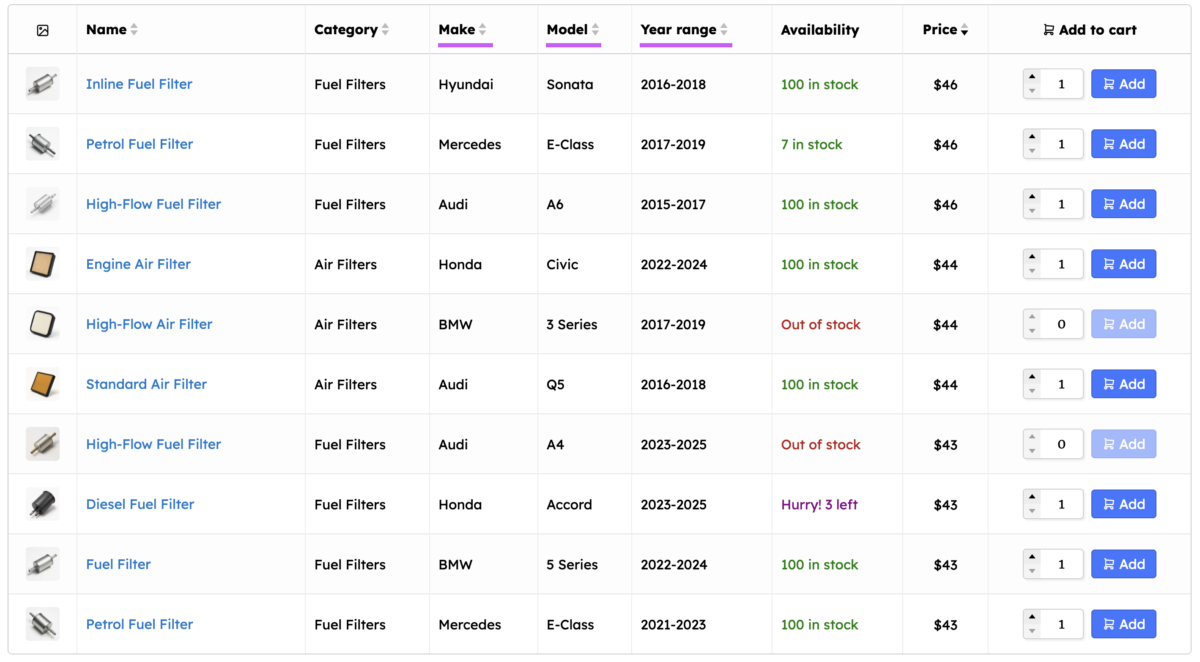
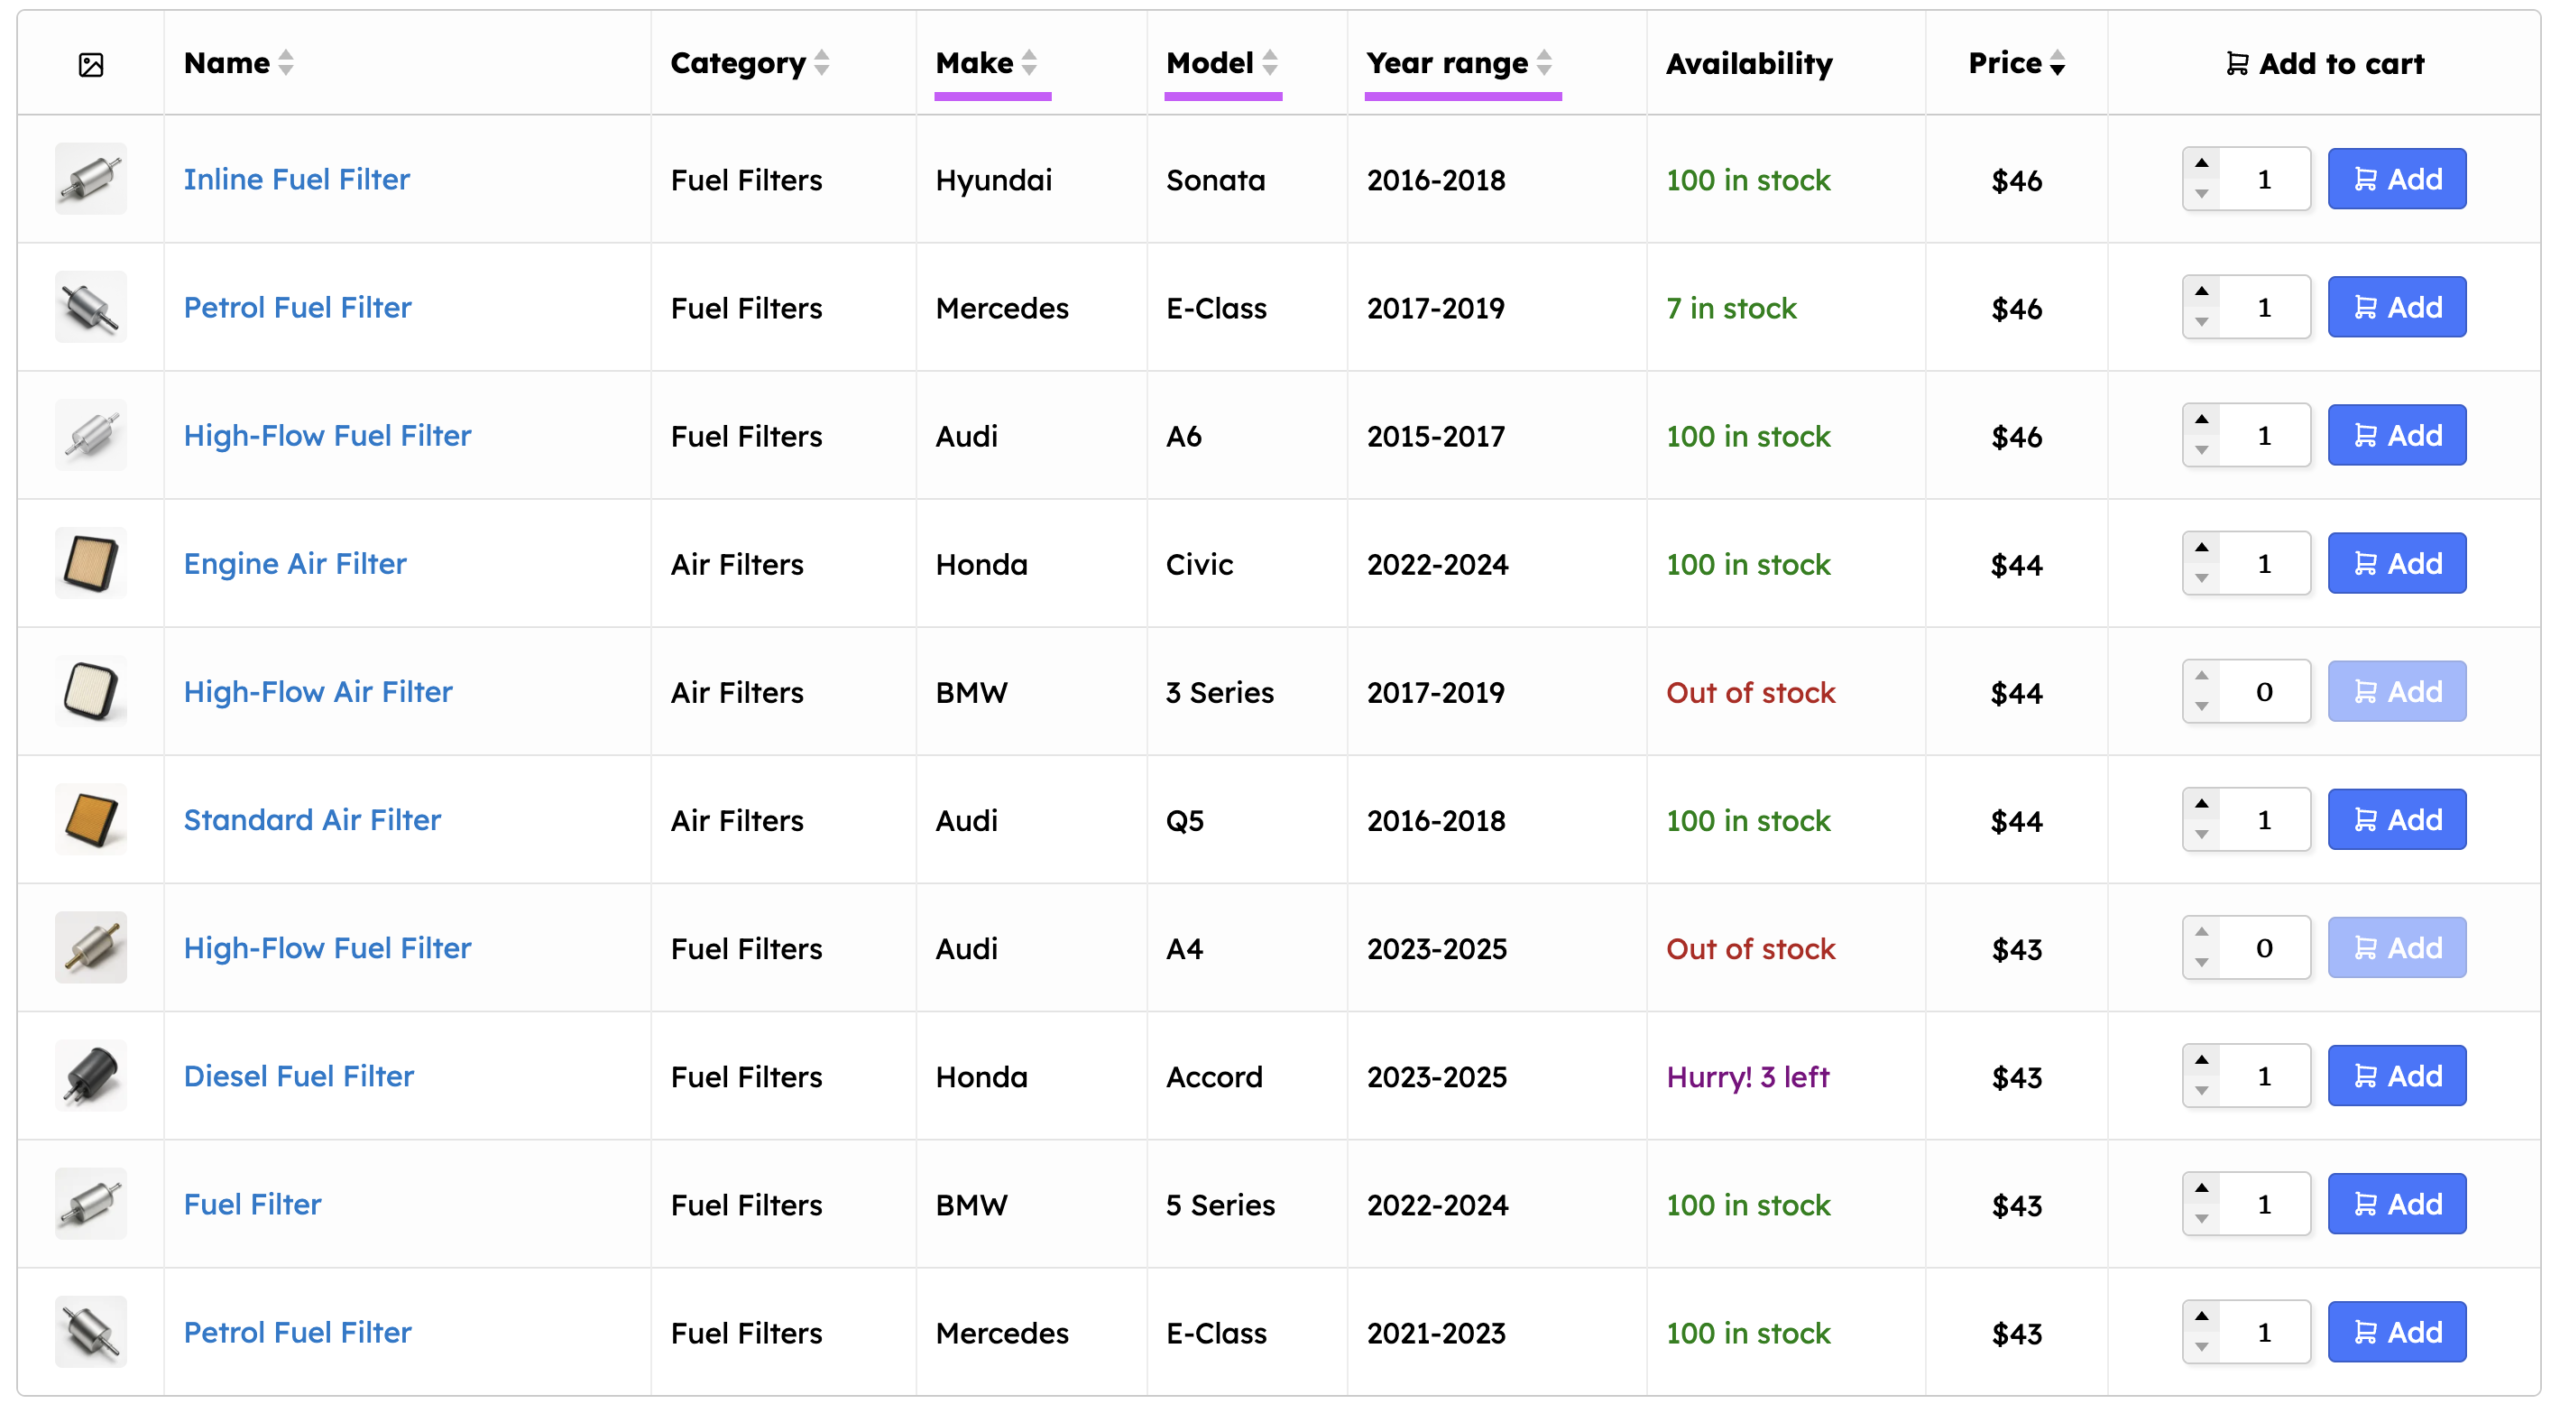
If you’re creating a product table layout, you can display WooCommerce product attributes in separate table columns. This makes it easy for shoppers to scan across the table and compare products based on properties such as size, material, capacity, or color.
If you’re creating a product list layout, you can instead display attributes in a nested grid inside each product row. This keeps product information neatly organized and makes important properties easy to identify.
Filtering products based on attributes
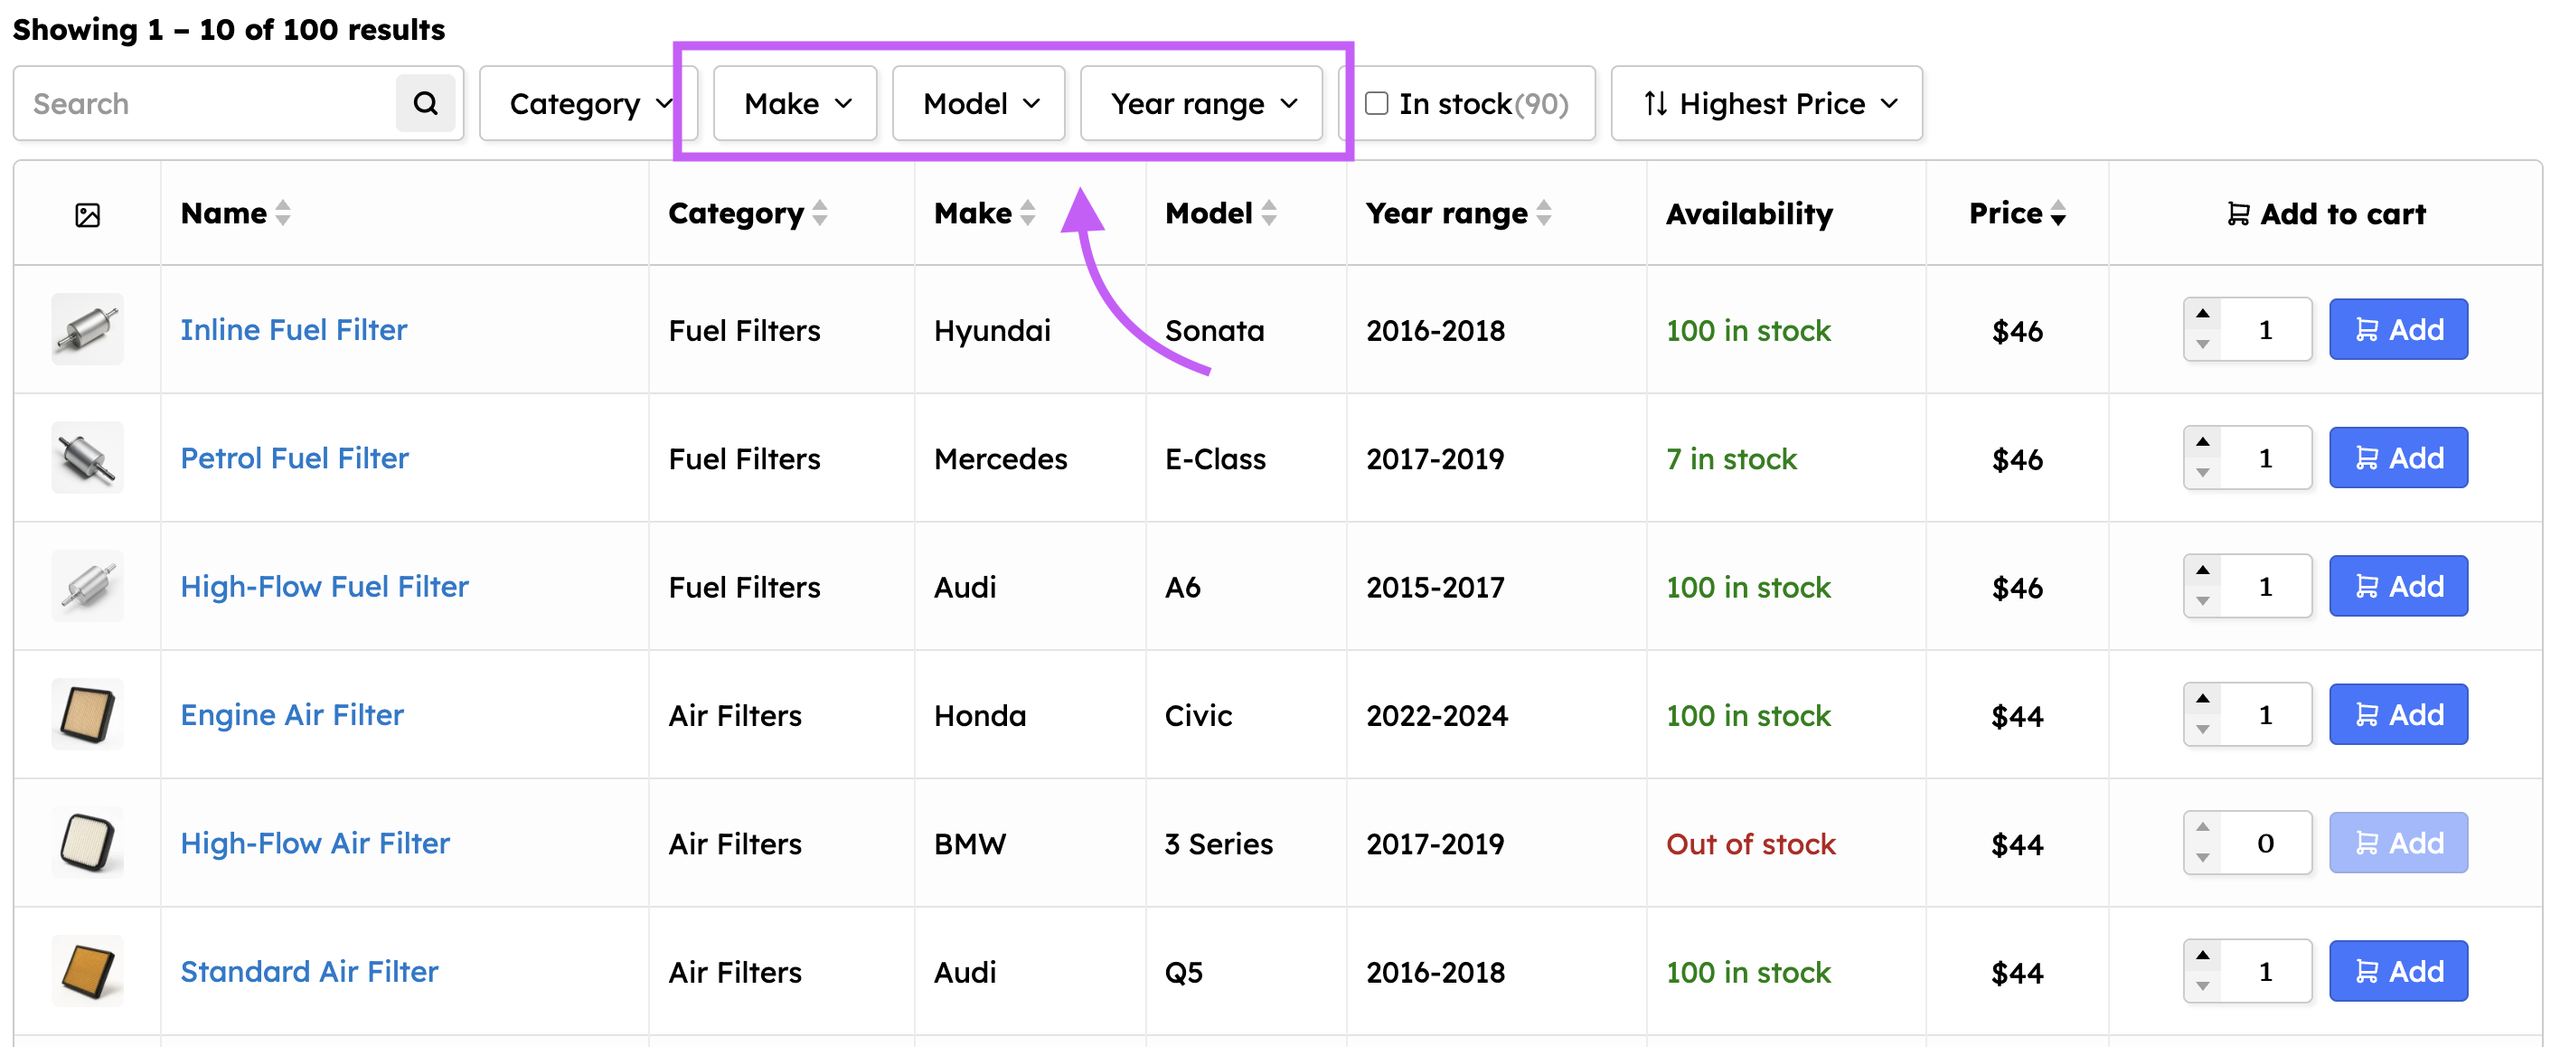
You can create navigation filters based on your WooCommerce product attributes. Shoppers can then select specific attribute terms to narrow down the product catalog and quickly find the products they’re interested in.
For example, they could filter products by Color: Black, Size: Large, or Material: Stainless Steel.
Searching products based on attributes
The product table plugin’s advanced search facility can also search through product attributes when returning results.
This means customers don’t necessarily need to know the exact product name. They can enter a descriptive search phrase such as “blue winter wool jacket”, and the plugin can return products matching relevant attribute terms such as:
Color: Blue
Season: Winter
Material: Wool
Clothing type: Jacket
This can be especially useful for large catalogs where shoppers are more likely to know the type of product they need than its exact name.

For more information you can read the official WooCommerce documentation on product attributes.
Examples of WooCommerce product attributes
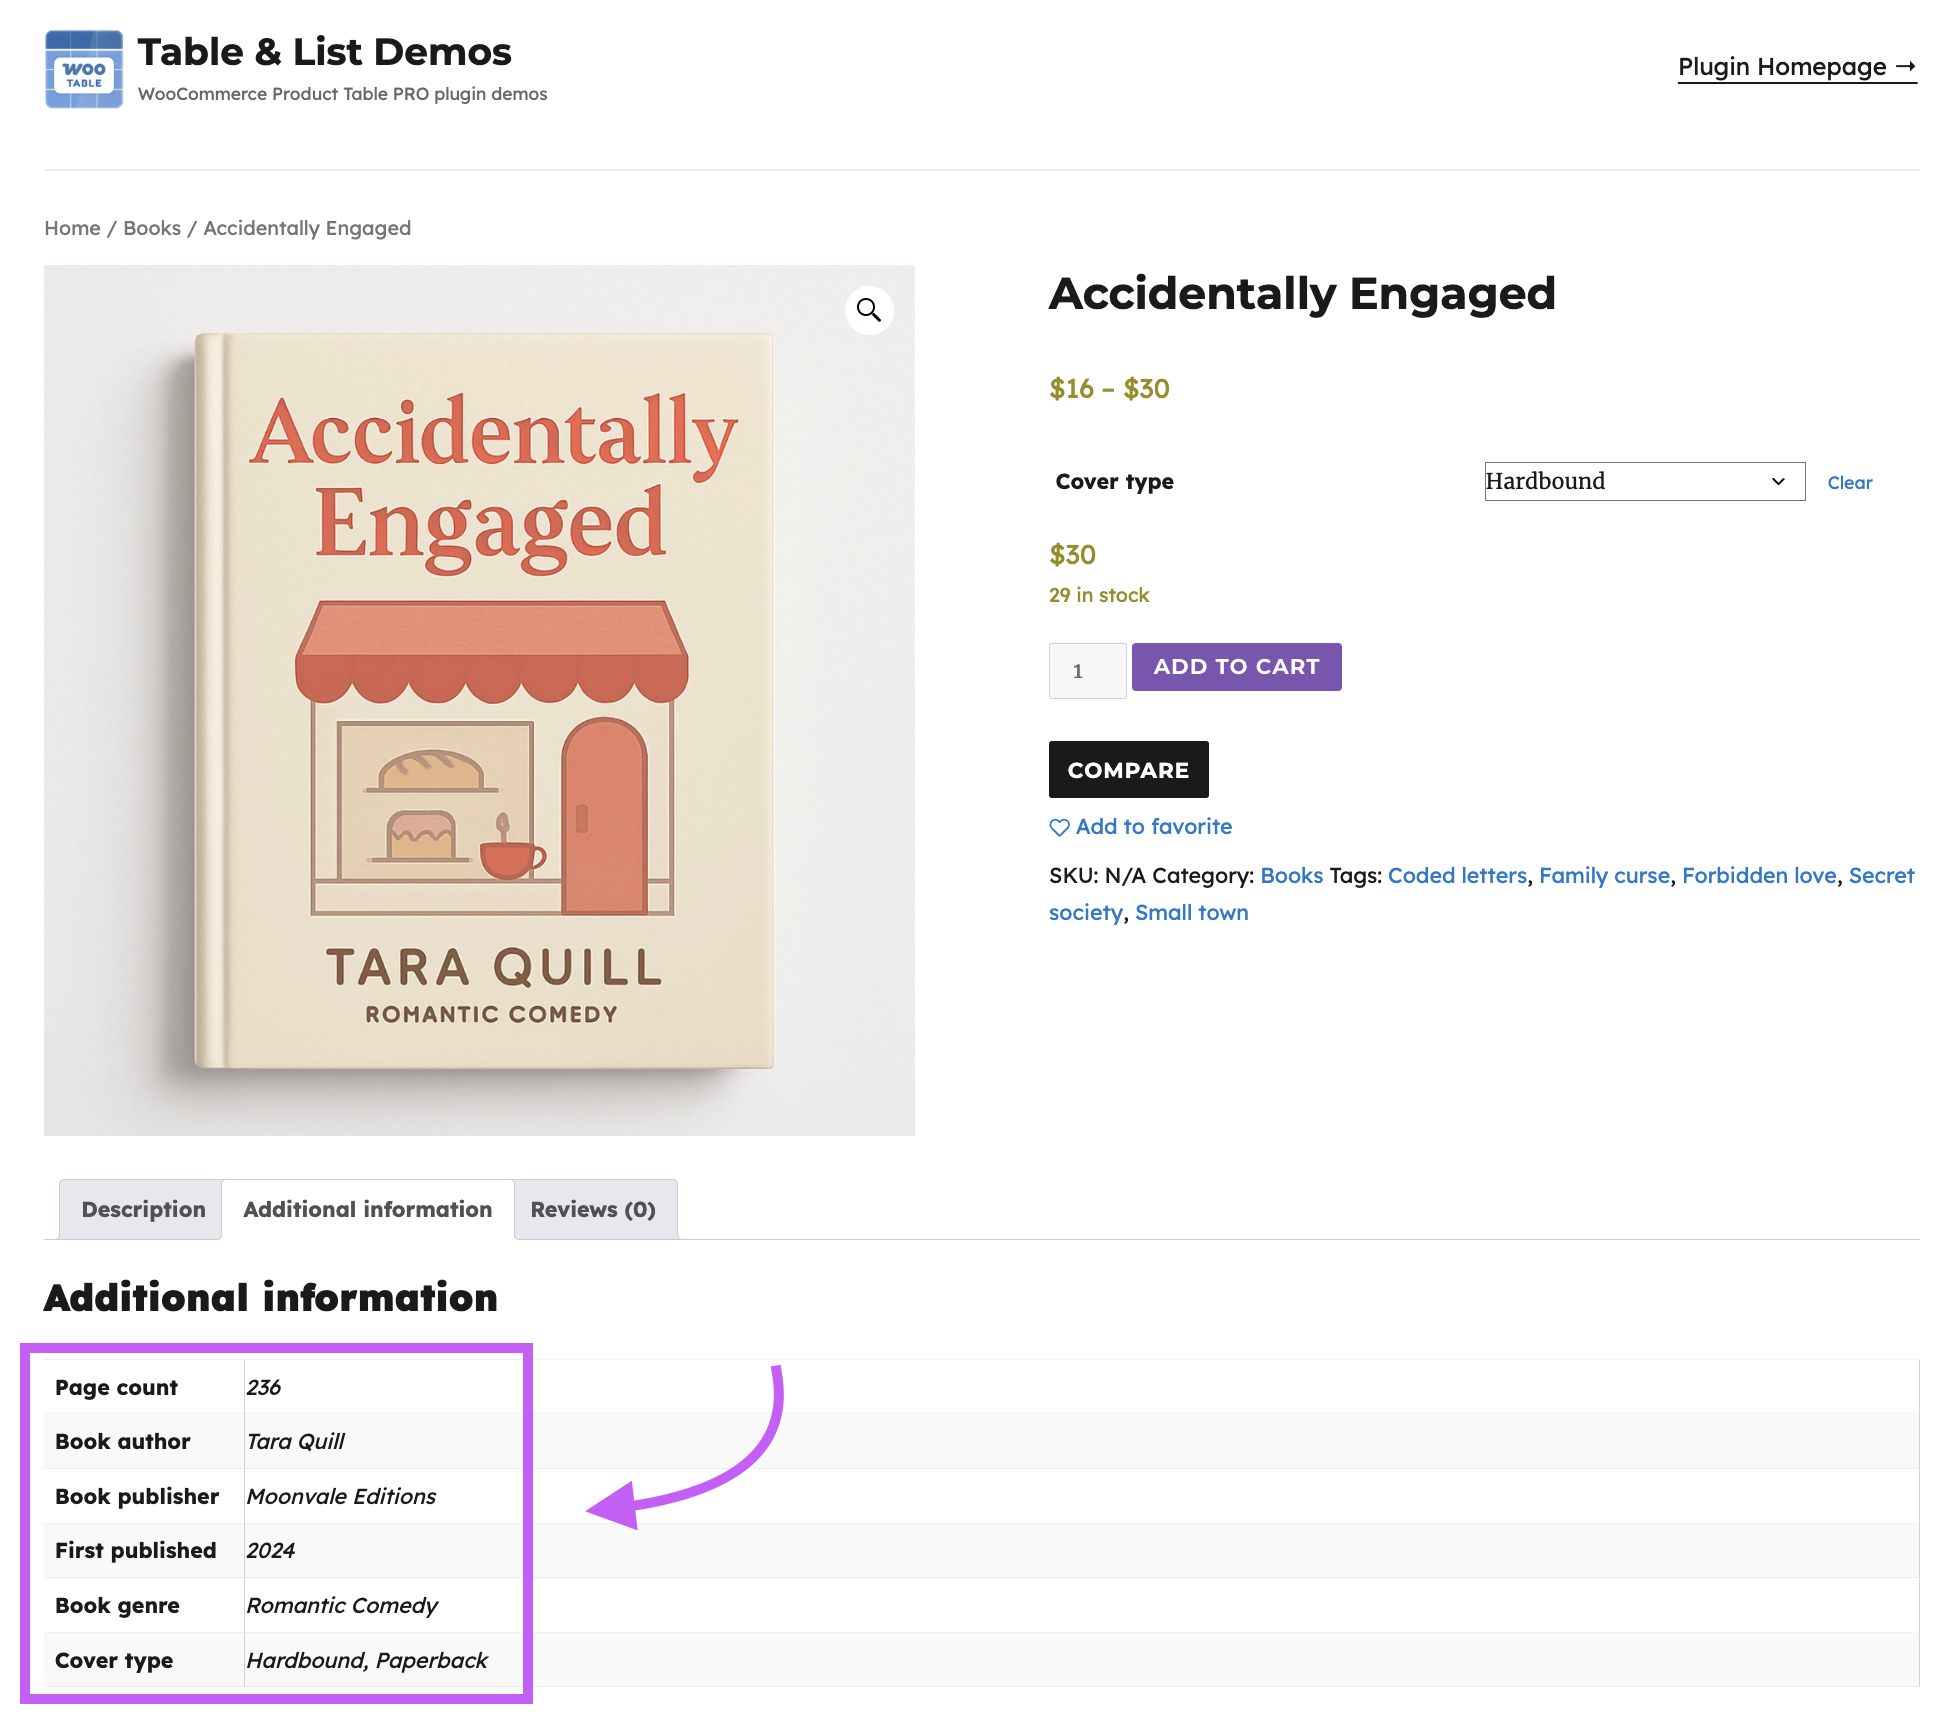
Below is an example of a woocommerce product with attributes. Our fictional product is a book called ‘Accidentally Engaged’ with properties such as author, page count, publisher, etc which are all represented via WooCommerce attributes.
Here is another example of a WooCommerce product. This time we’re looking at a pizza with a combination of WooCommerce attributes that help describe it to customers.
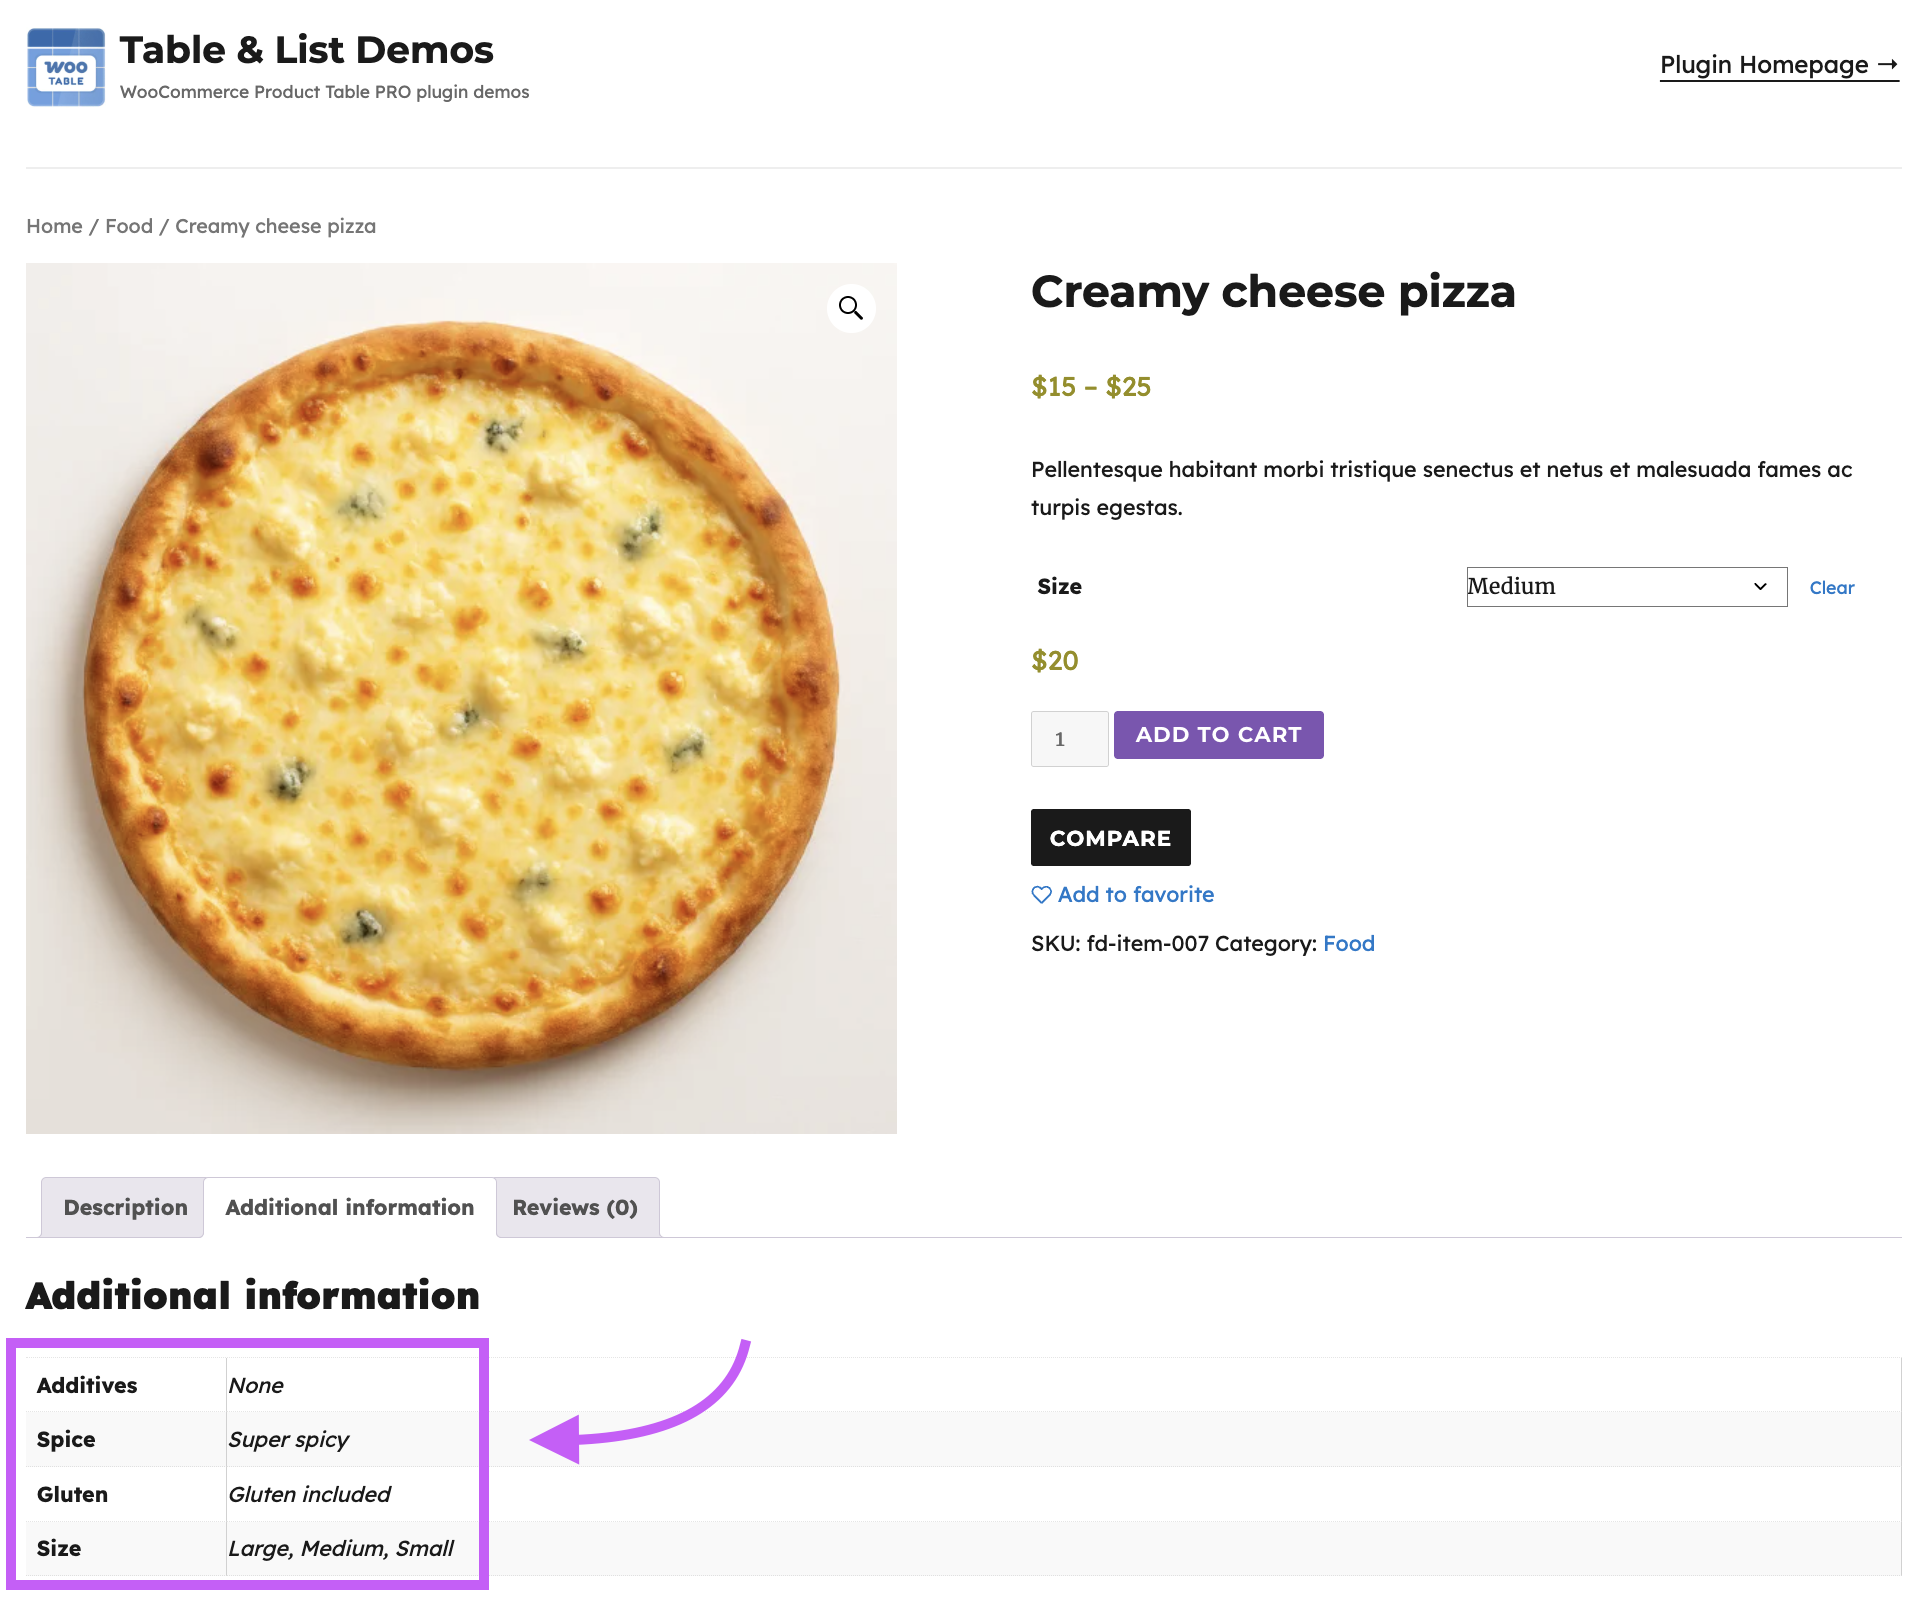
As you can see we can assign our WooCommerce products different sets of attributes to help our site visitors better understand our products.
How to setup WooCommerce attributes
To add attributes to your products, first create them in Products → Attributes in your WordPress dashboard. And once you’ve created a WooCommerce attribute, you can also create values for that attribute called ‘terms’. For example, you might create an attribute called ‘Color‘, then add terms such as Black, Blue, and White. Or you might create a ‘Size‘ attribute and add terms like Large, Medium and Small.
Next, open the settings of any product where you wish to add your new attribute. Then open the Attributes section under Product data, add the attribute you created, and select the terms that apply to that product. For example, one shirt might use Black and Blue, while another might use White only.
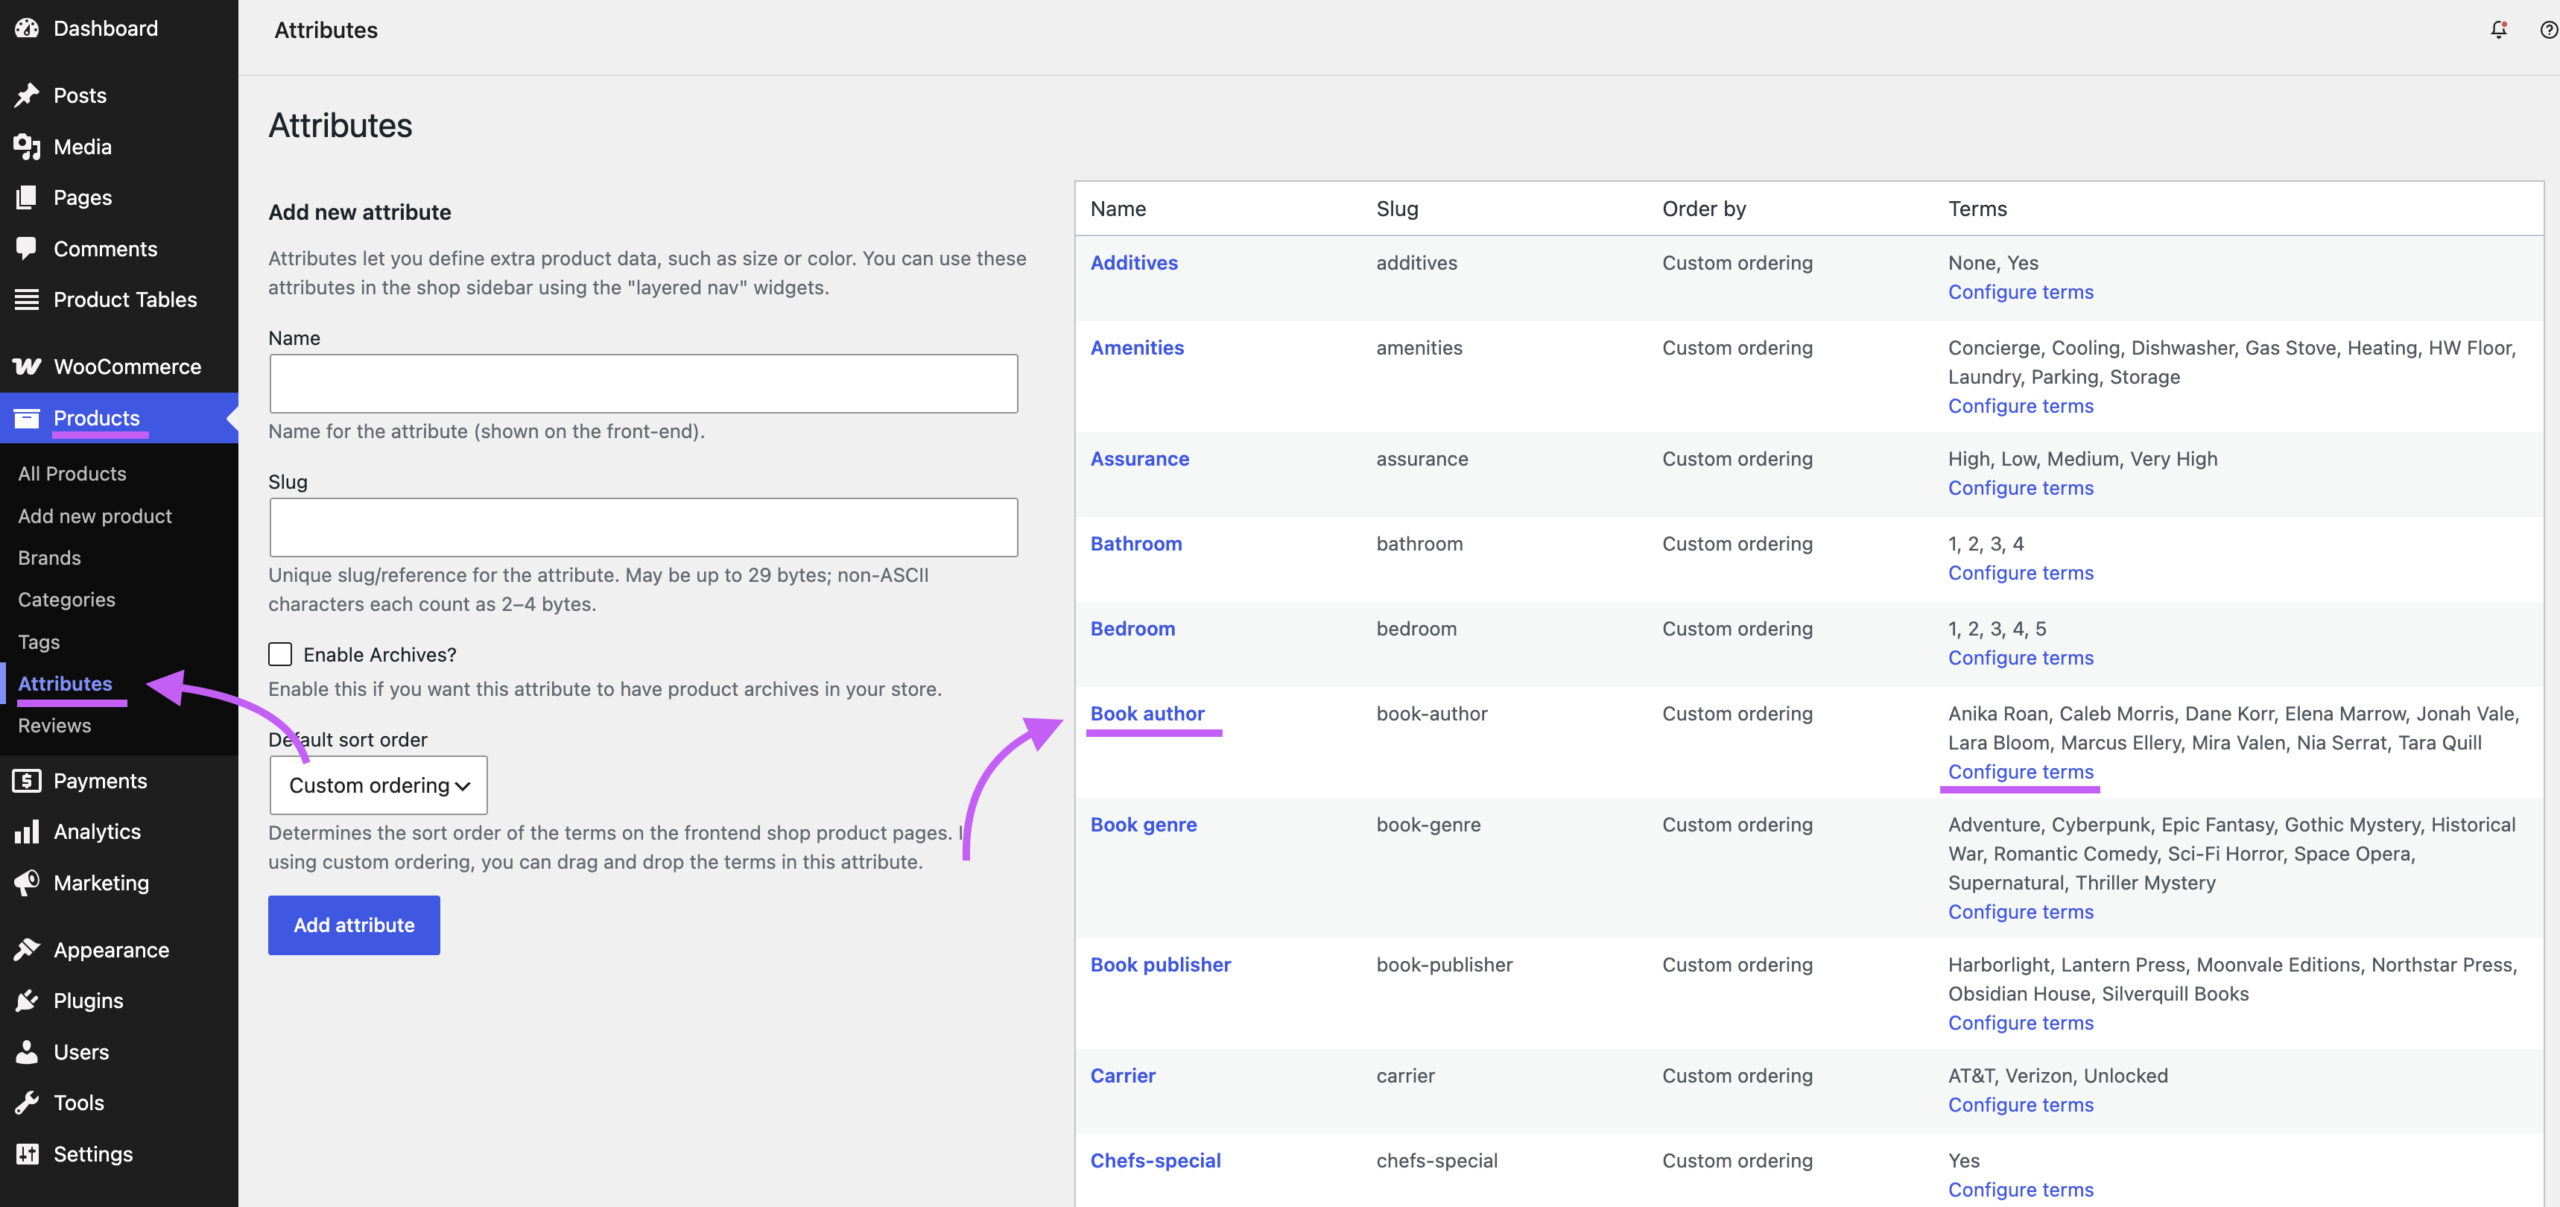
For this tutorial, we will only be working with global WooCommerce attributes. These are attributes created under Products → Attributes and reusable across multiple products. WooCommerce also supports custom attributes that are created at product level, but those are not covered here (global attributes are generally much better).
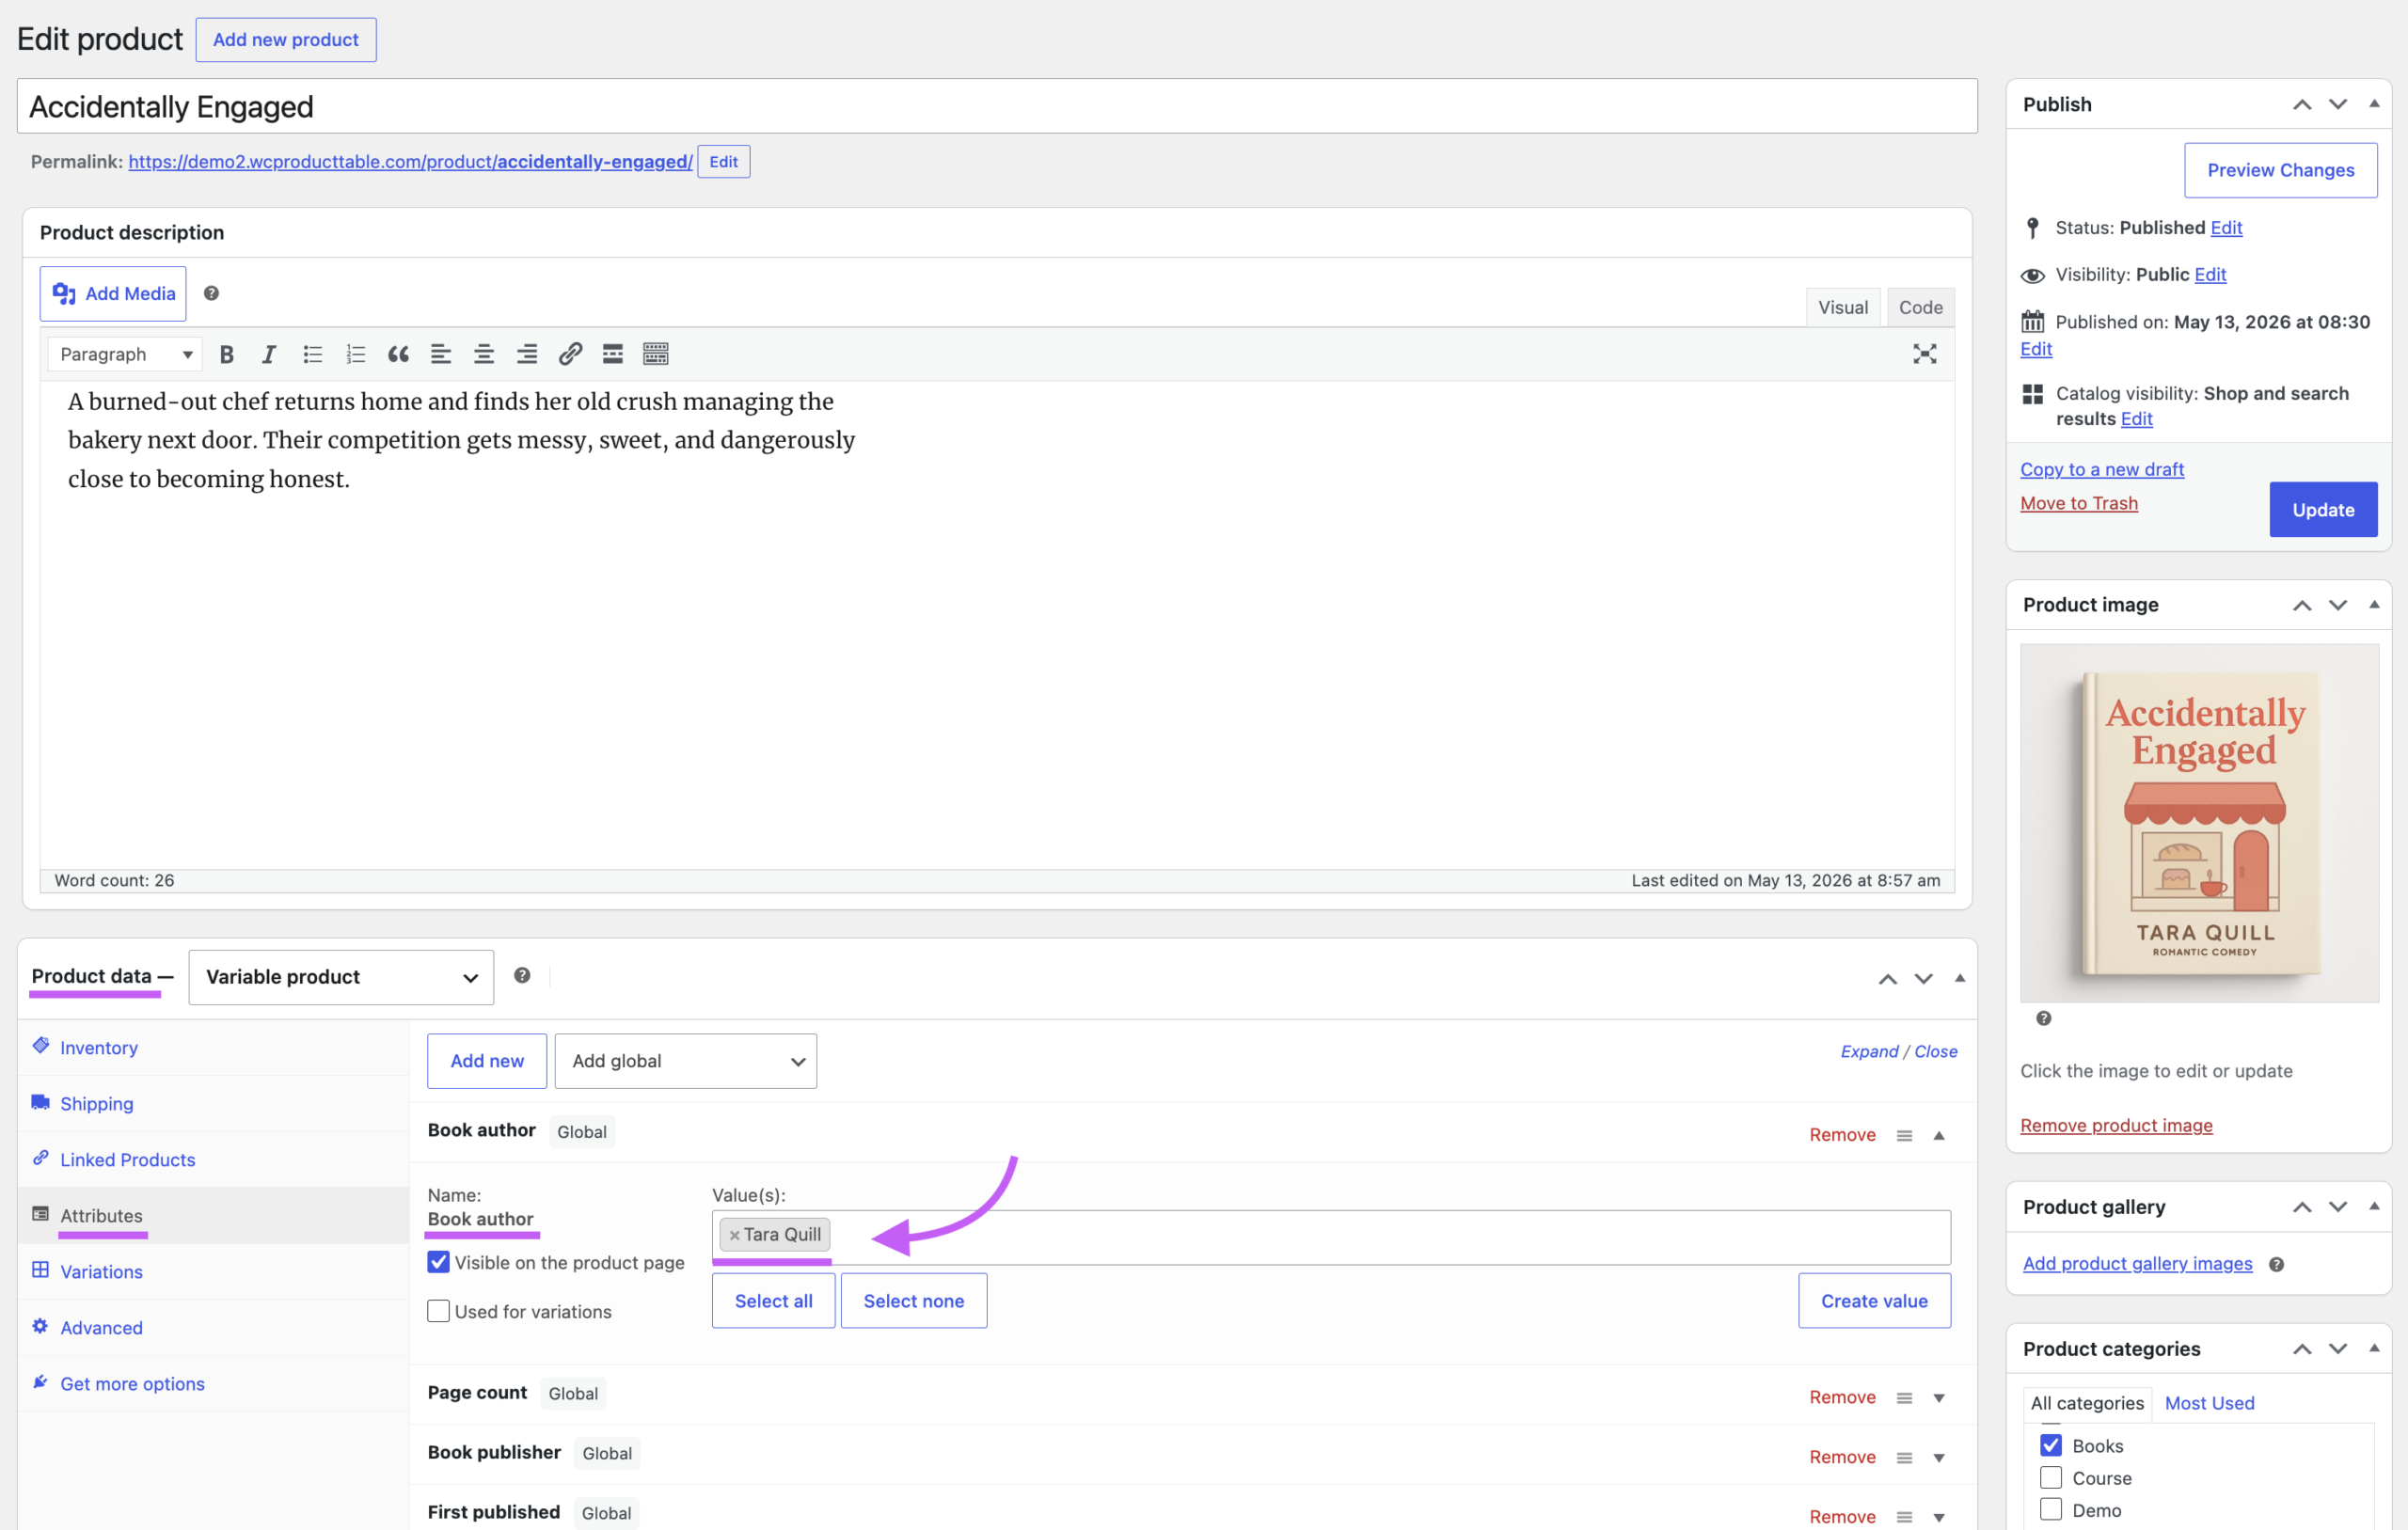
Once you’ve followed these steps the frontend product page will show your new attribute in the ‘Additional details’ tab as you can see in our previous screenshots.
For detailed instructions, see the official WooCommerce documentation on creating and assigning product attributes.
Create attribute columns in the table
Once you’ve created global WooCommerce attributes for your products, and you can see these attributes on the product page, let’s look into showing these attributes in our product table.
There are two ways by which we can create attribute columns in our product table. The first way is to use the automatic attribute column generator which helps us set up multiple attribute columns in one go and it’s the simpler and recommended method. The second is setting up individual attribute columns in the table which gives us more power and control over the column set up but is not required in most cases. Below we’ll cover both methods.
Bulk generate attribute column in the table
To bulk generate attribute columns, go to your product table’s settings → columns → open the device column tab eg: Laptop → Next to the blue ‘+ Add column’ button you’ll see a dropdown. Click it to open a dropdown menu with premade table columns. Click the ‘+ Attribute columns’ option to add the bulk attribute column generator to your table.
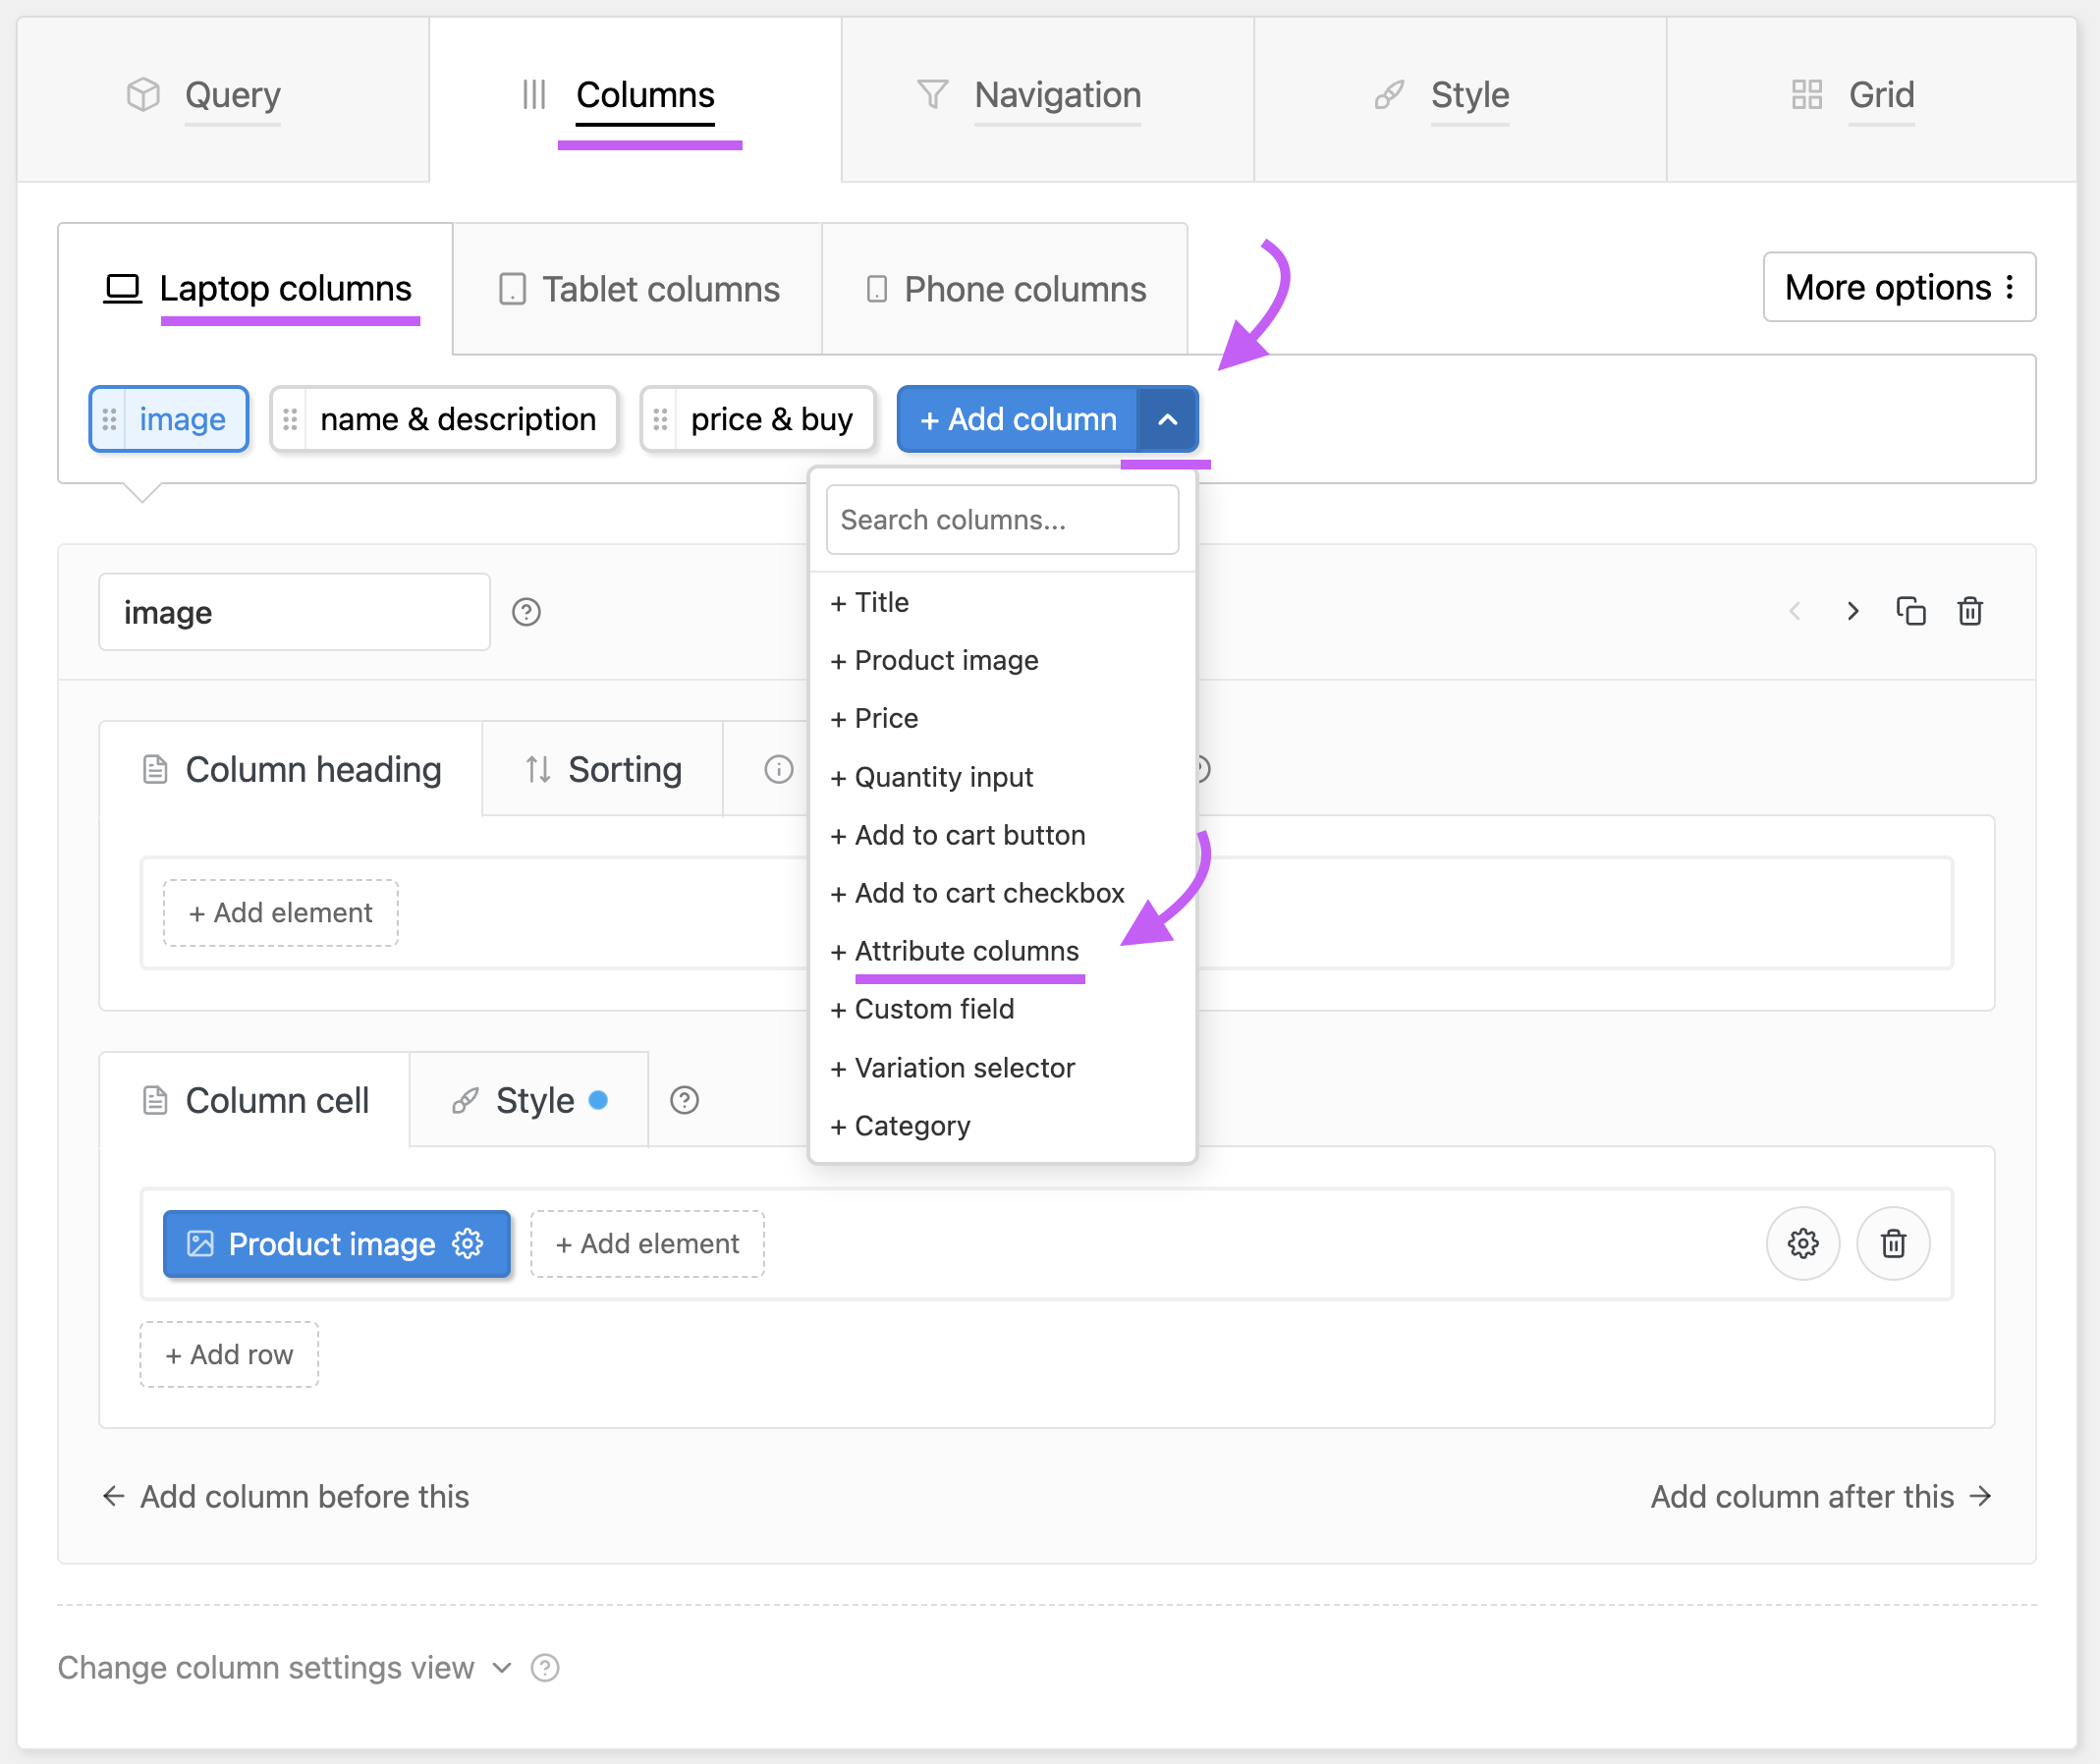
This will add a special kind of column settings to your table titled ‘Auto-generate attribute columns’. Here you can configure the settings for generating your attribute columns such as deciding which attributes should be displayed in the table, whether they should have sorting icons in the column heading, etc.
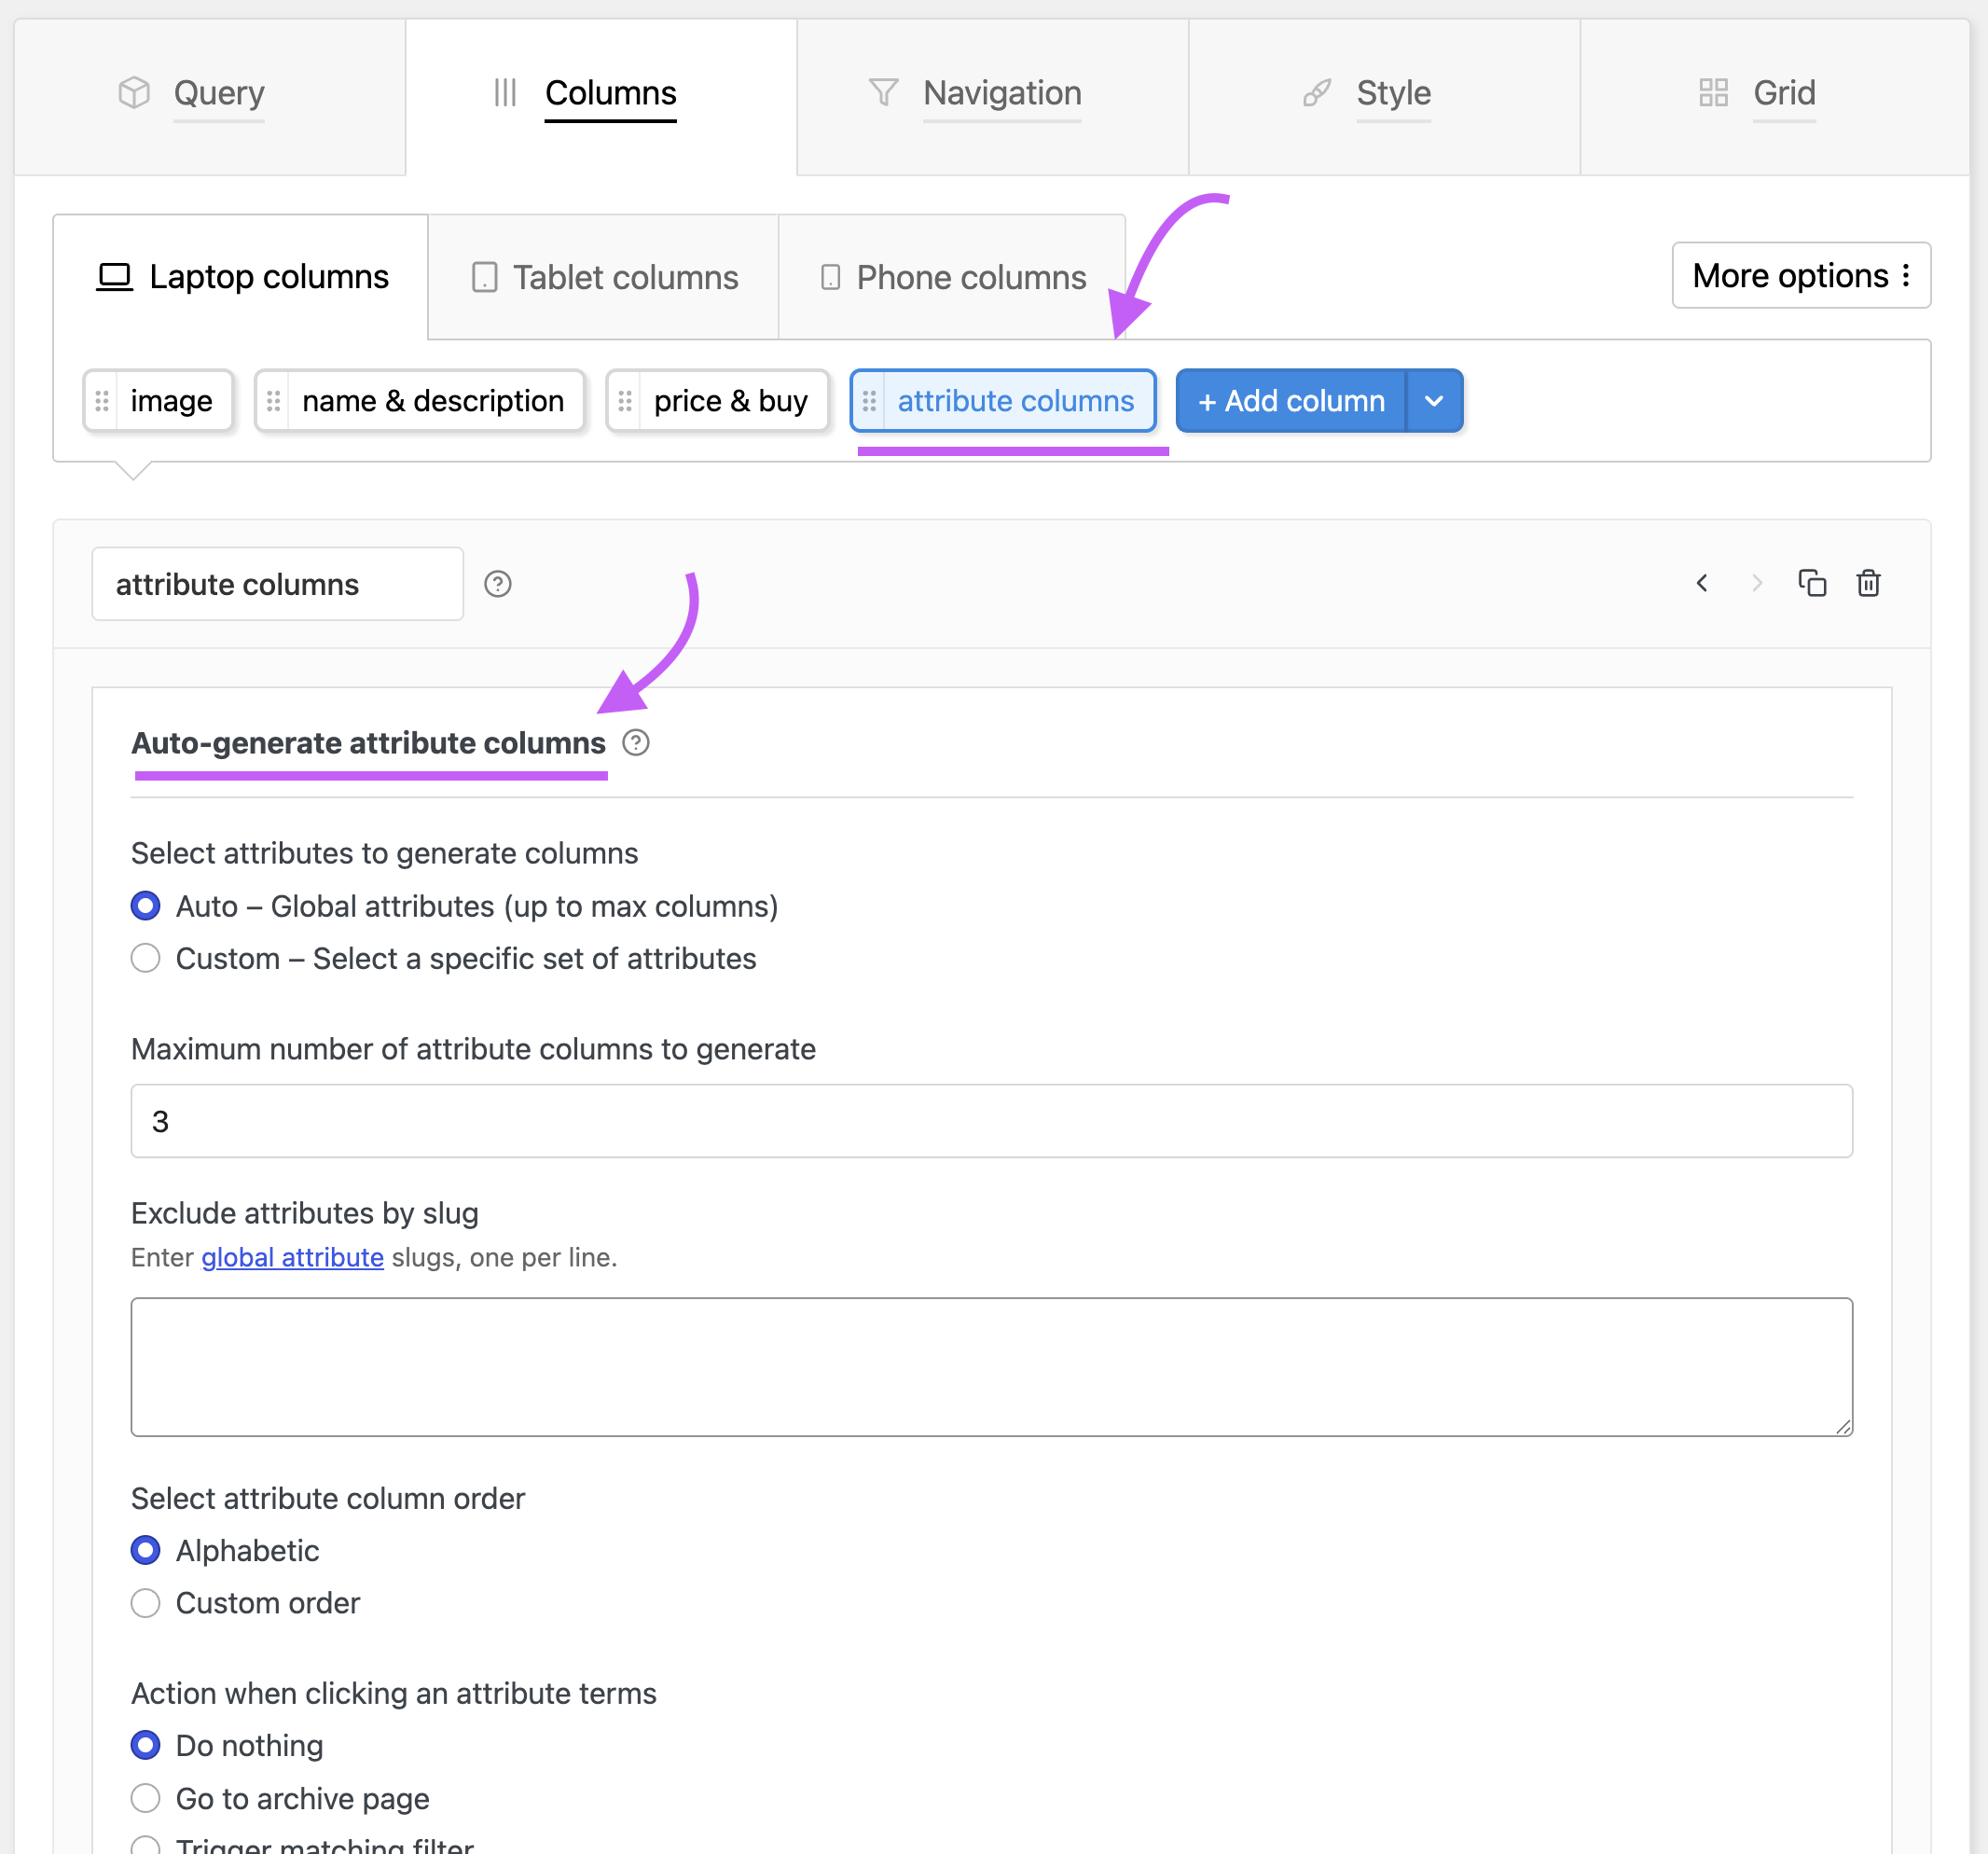
By default the attributes will be auto-selected for you. But you can instead select a specific set of attributes to create the columns. For this go to the attribute generator settings → in the very first option ‘Select attributes to generate columns’ choose the option ‘Custom’ → this will open and input field below where you need to enter the slugs of the attributes you wish to show in your table.
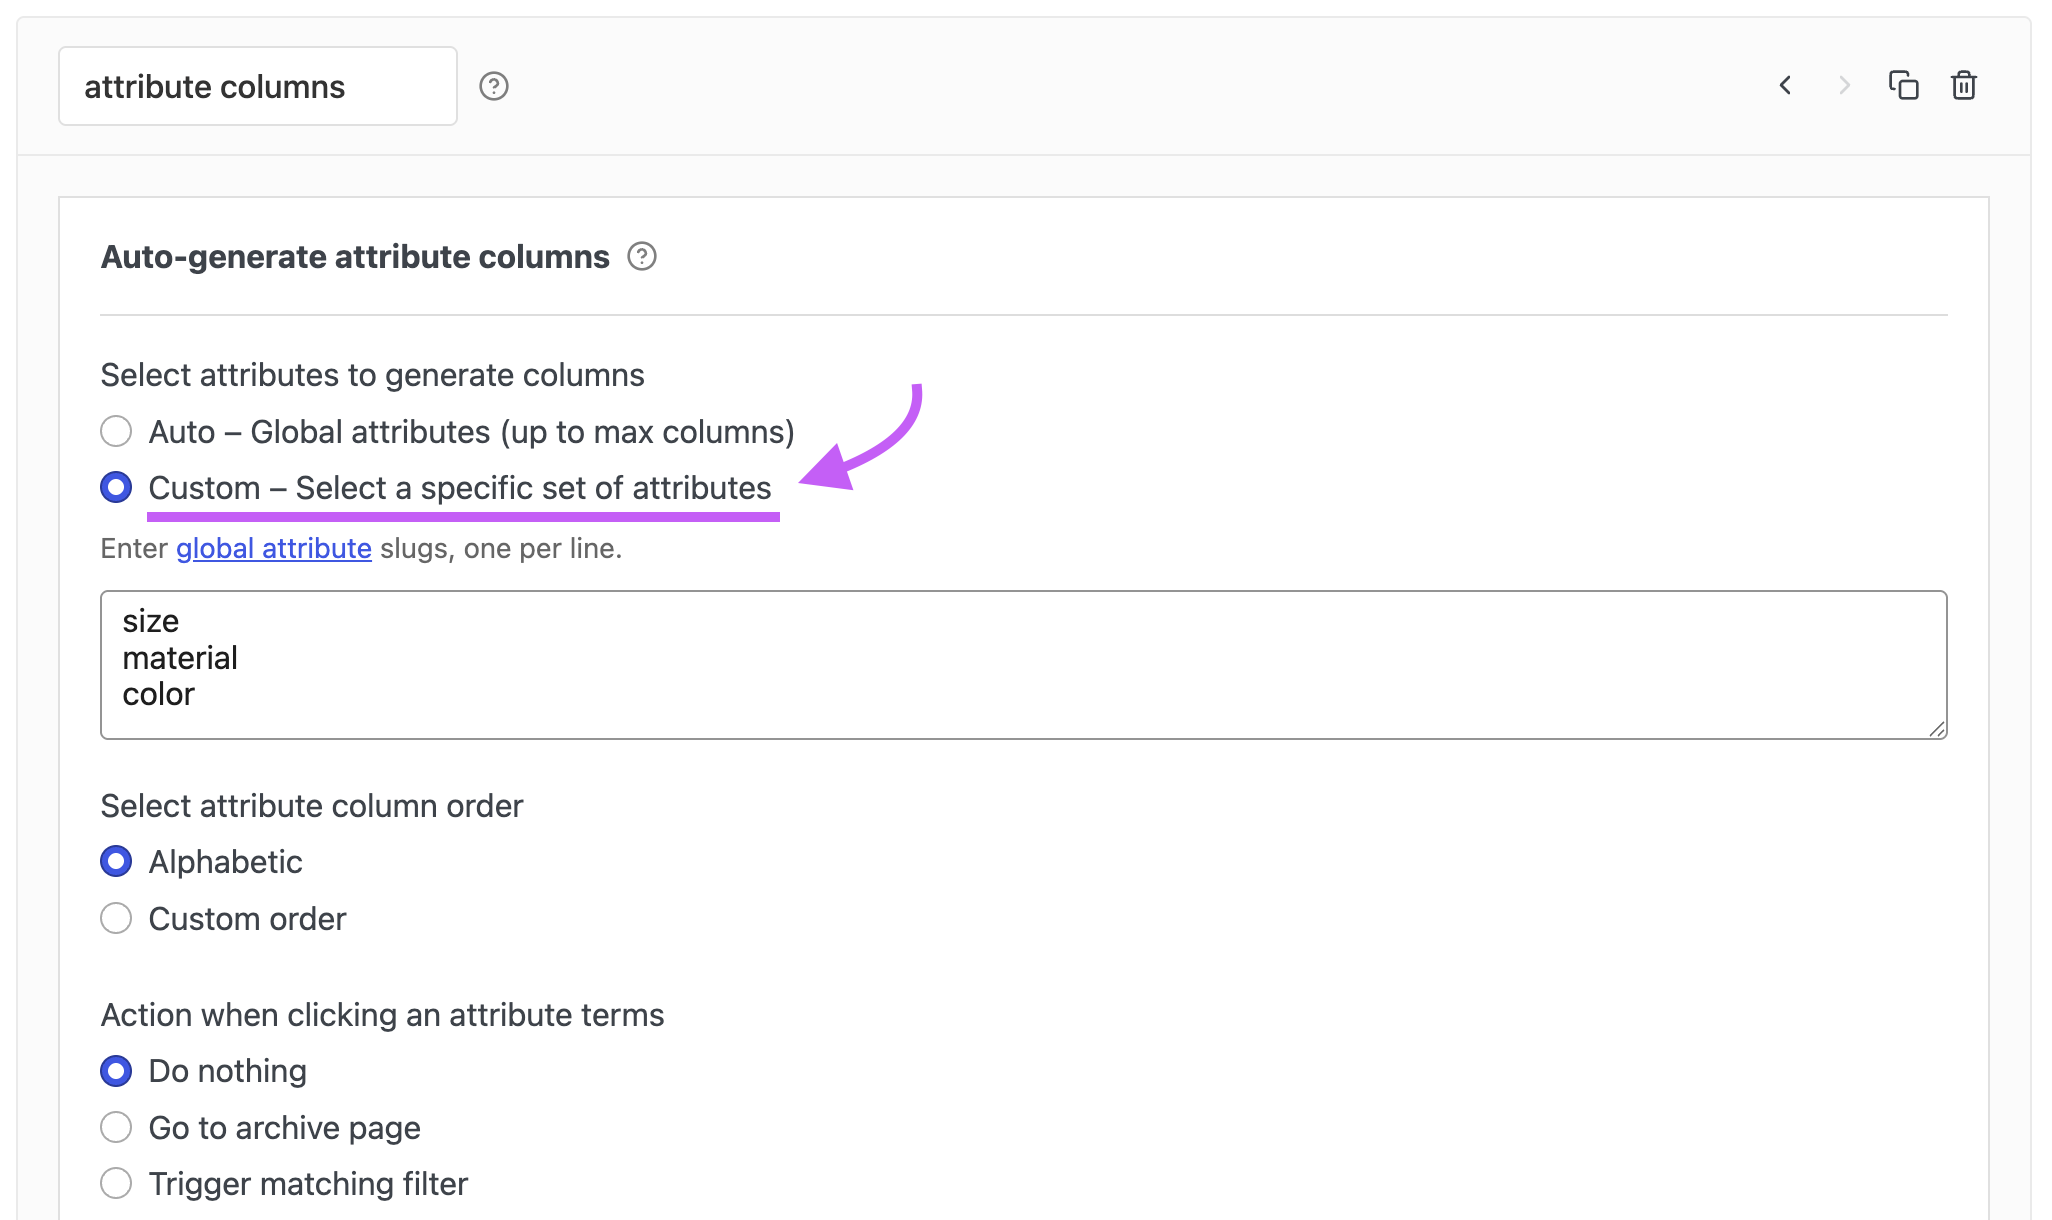
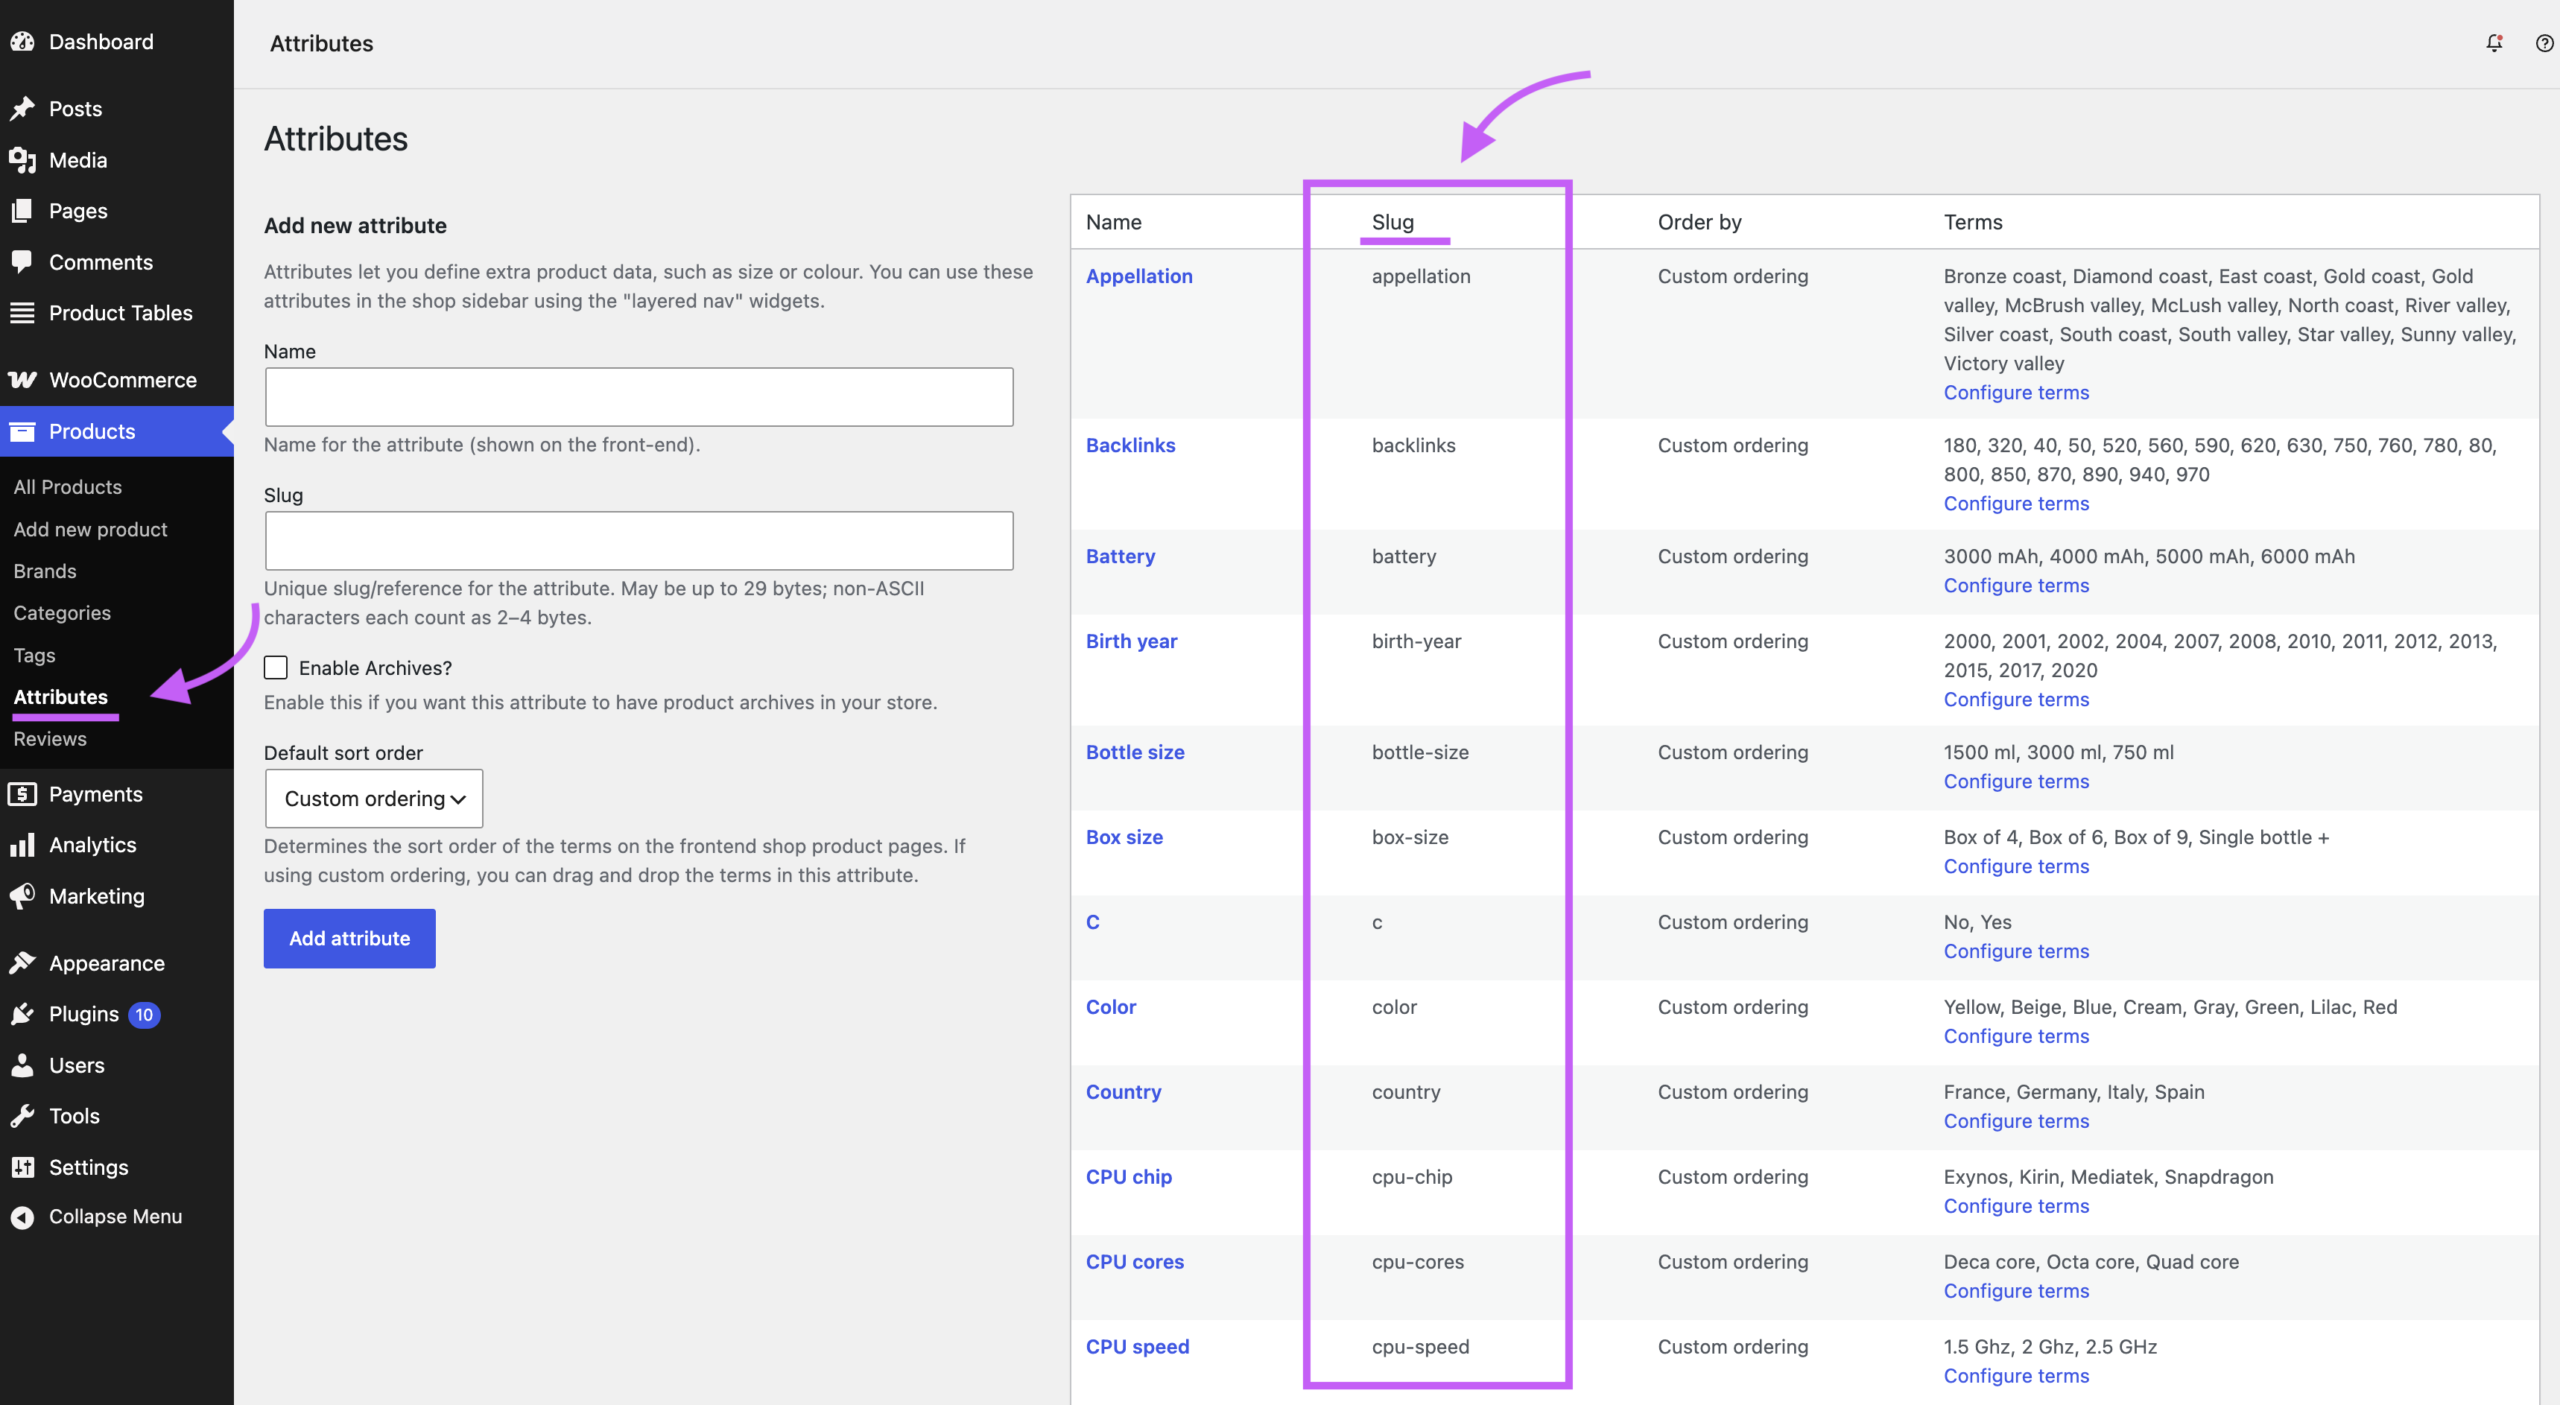
Note on attribute slugs: Whenever you create a new woocommerce global attribute, a slug is automatically generated for it by woocommerce. You can see in the above image that we provide a quick link to the global attributes page where you can see all your attributes slugs. For your reference, the page is located at wp admin → products → attributes. Below is an image of such a page with the slug column highlighted.
The bulk attribute column generator provides several other options that are self-explanatory and very useful. Feel free to explore them at your leisure.
Individually add attribute columns in the table
The other way to add attribute columns to your table is to manually create and configure each column. For example let’s say we have a WooCommerce global attribute ‘Size’, and a term such as ‘Large’, ‘Medium’ or ‘Small’ is attached to each of our products. We wish to create a new column in our table that displays product size based on this attribute.
For this, go to the table’s settings → columns → open the device tab eg: Laptop → click the ‘+ Add column’ button to add a new blank column in our table.
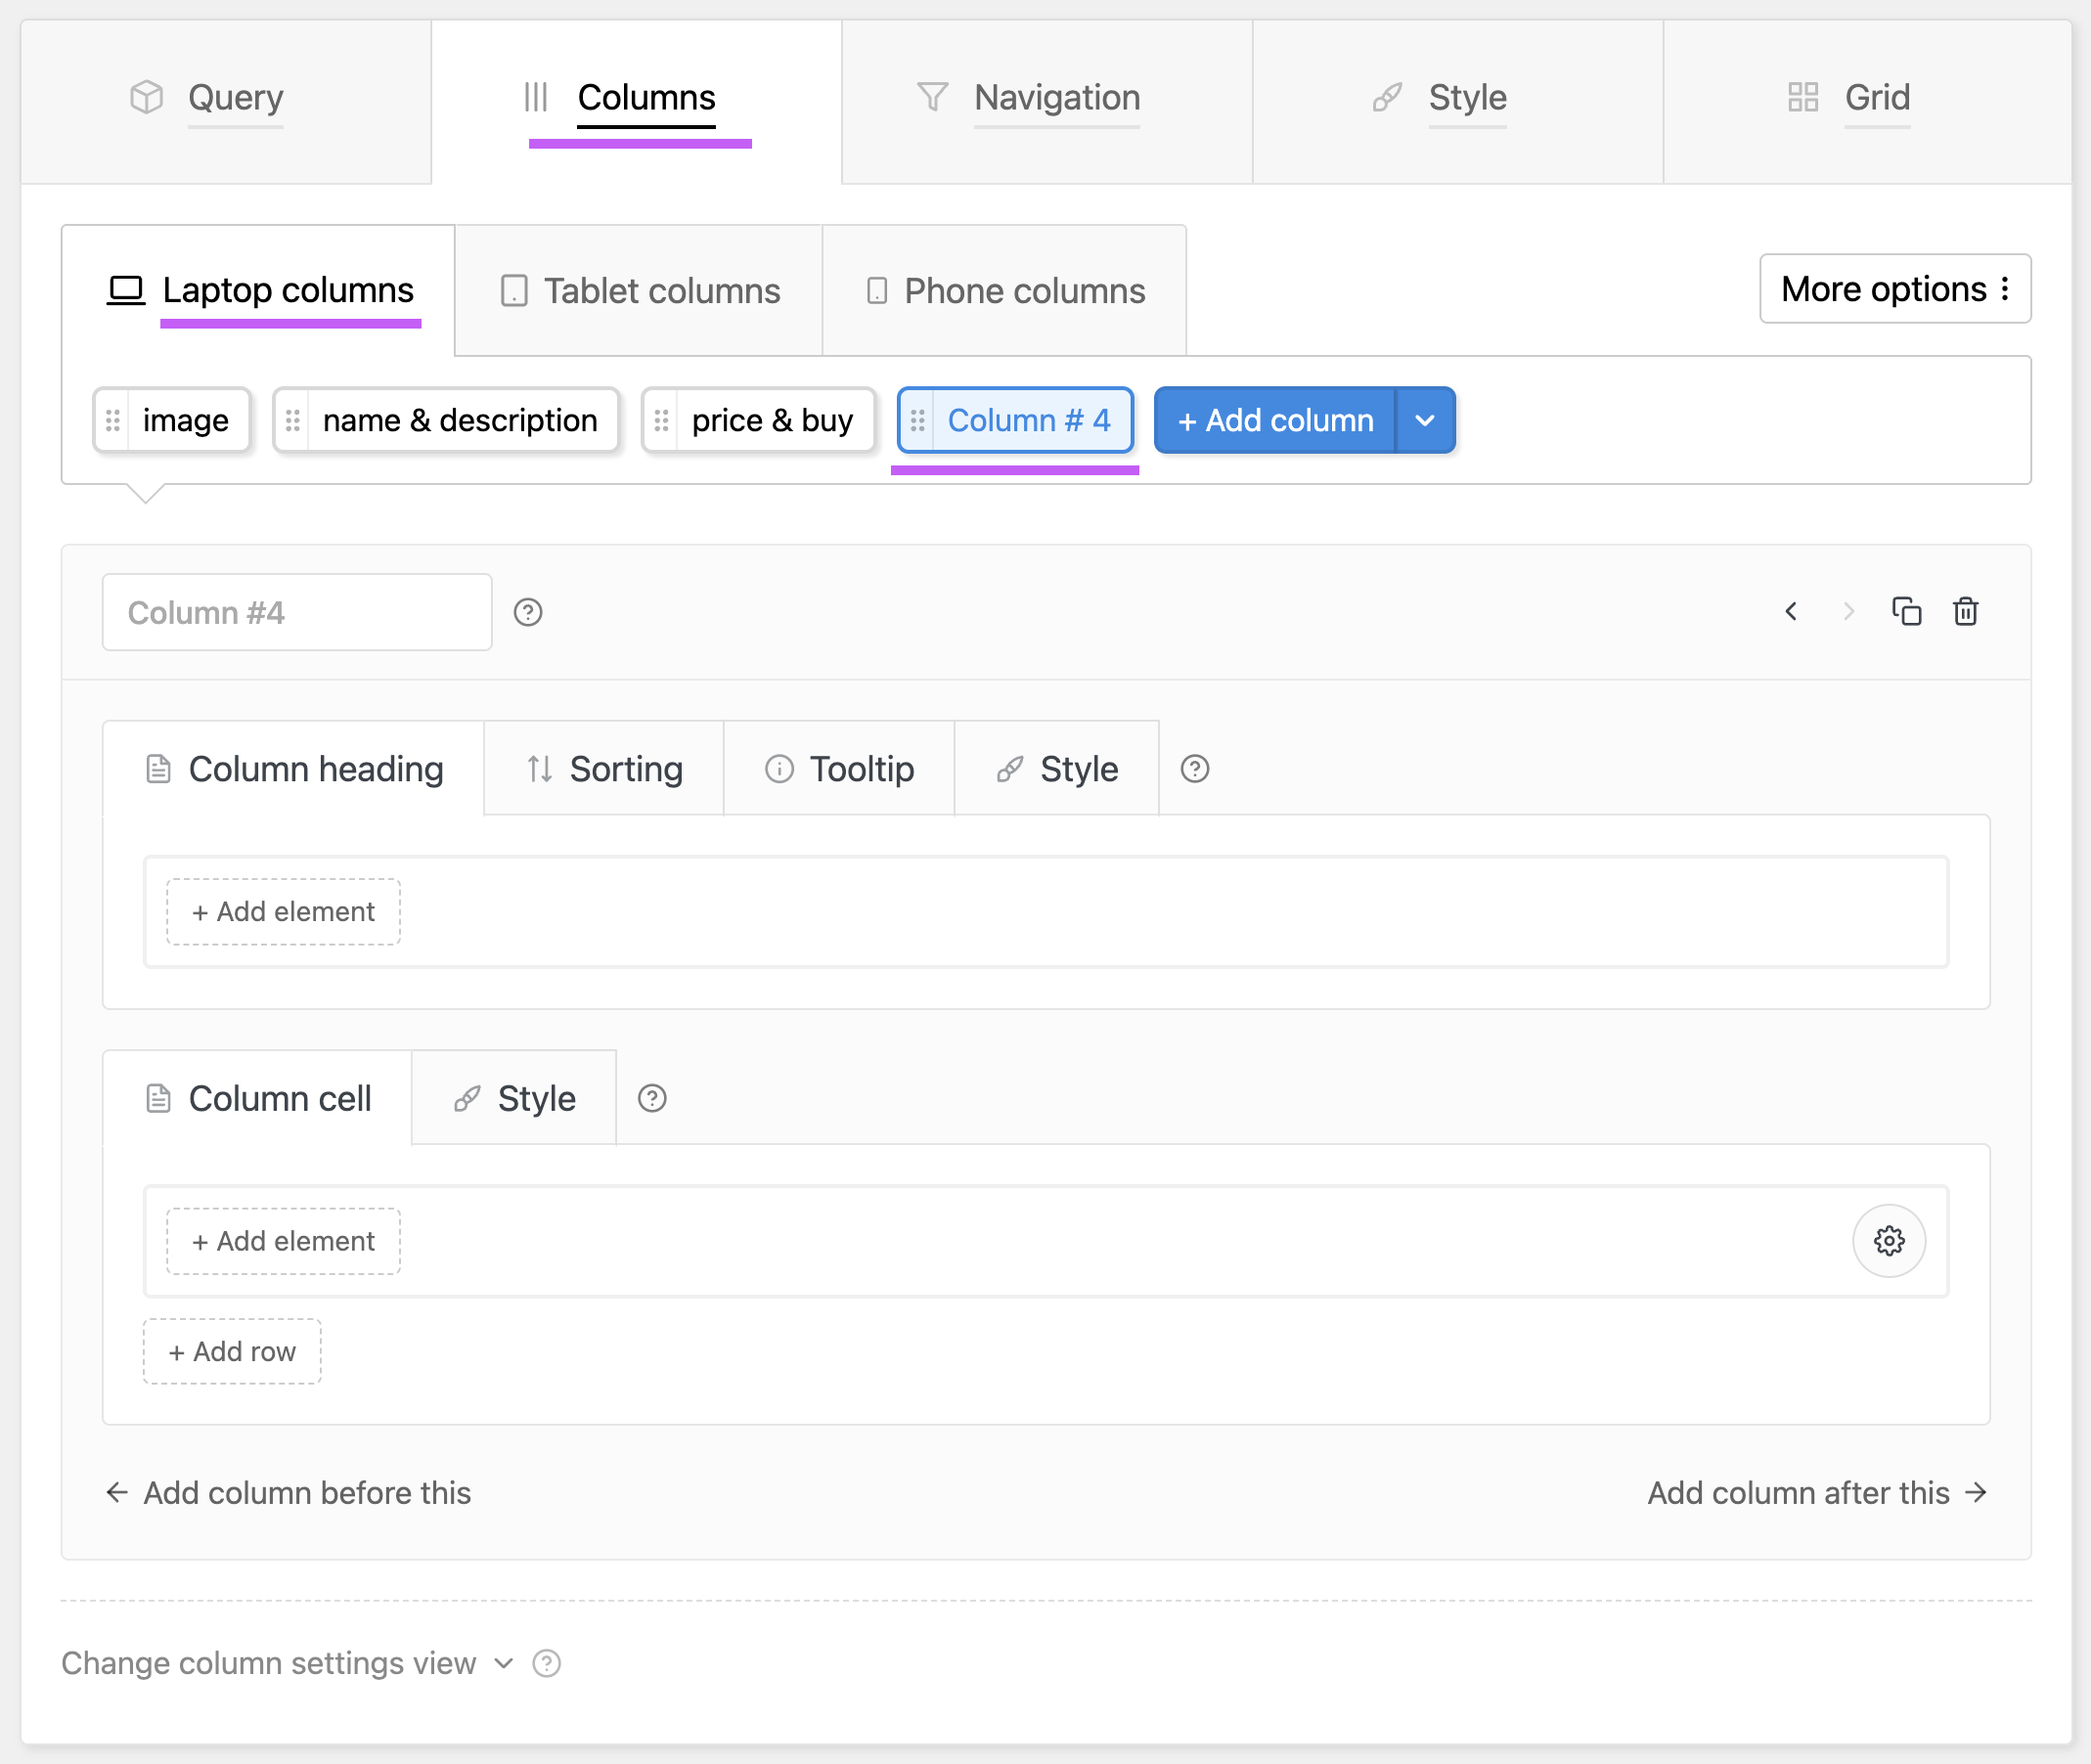
No we’ll configure this blank column to show the ‘Size’ attribute for our products.
In the blank column’s settings the very first input at the top is the column name. The name we enter here is immaterial to the table on the frontend and this field is completely option. But it helps us keep our editor organized because the same name will appear in the column button above. Since we want this column to show the size attribute let’s name this column ‘size’ for convenient reference. Once you do that, you’ll notice the corresponding column button above also reads ‘size’.
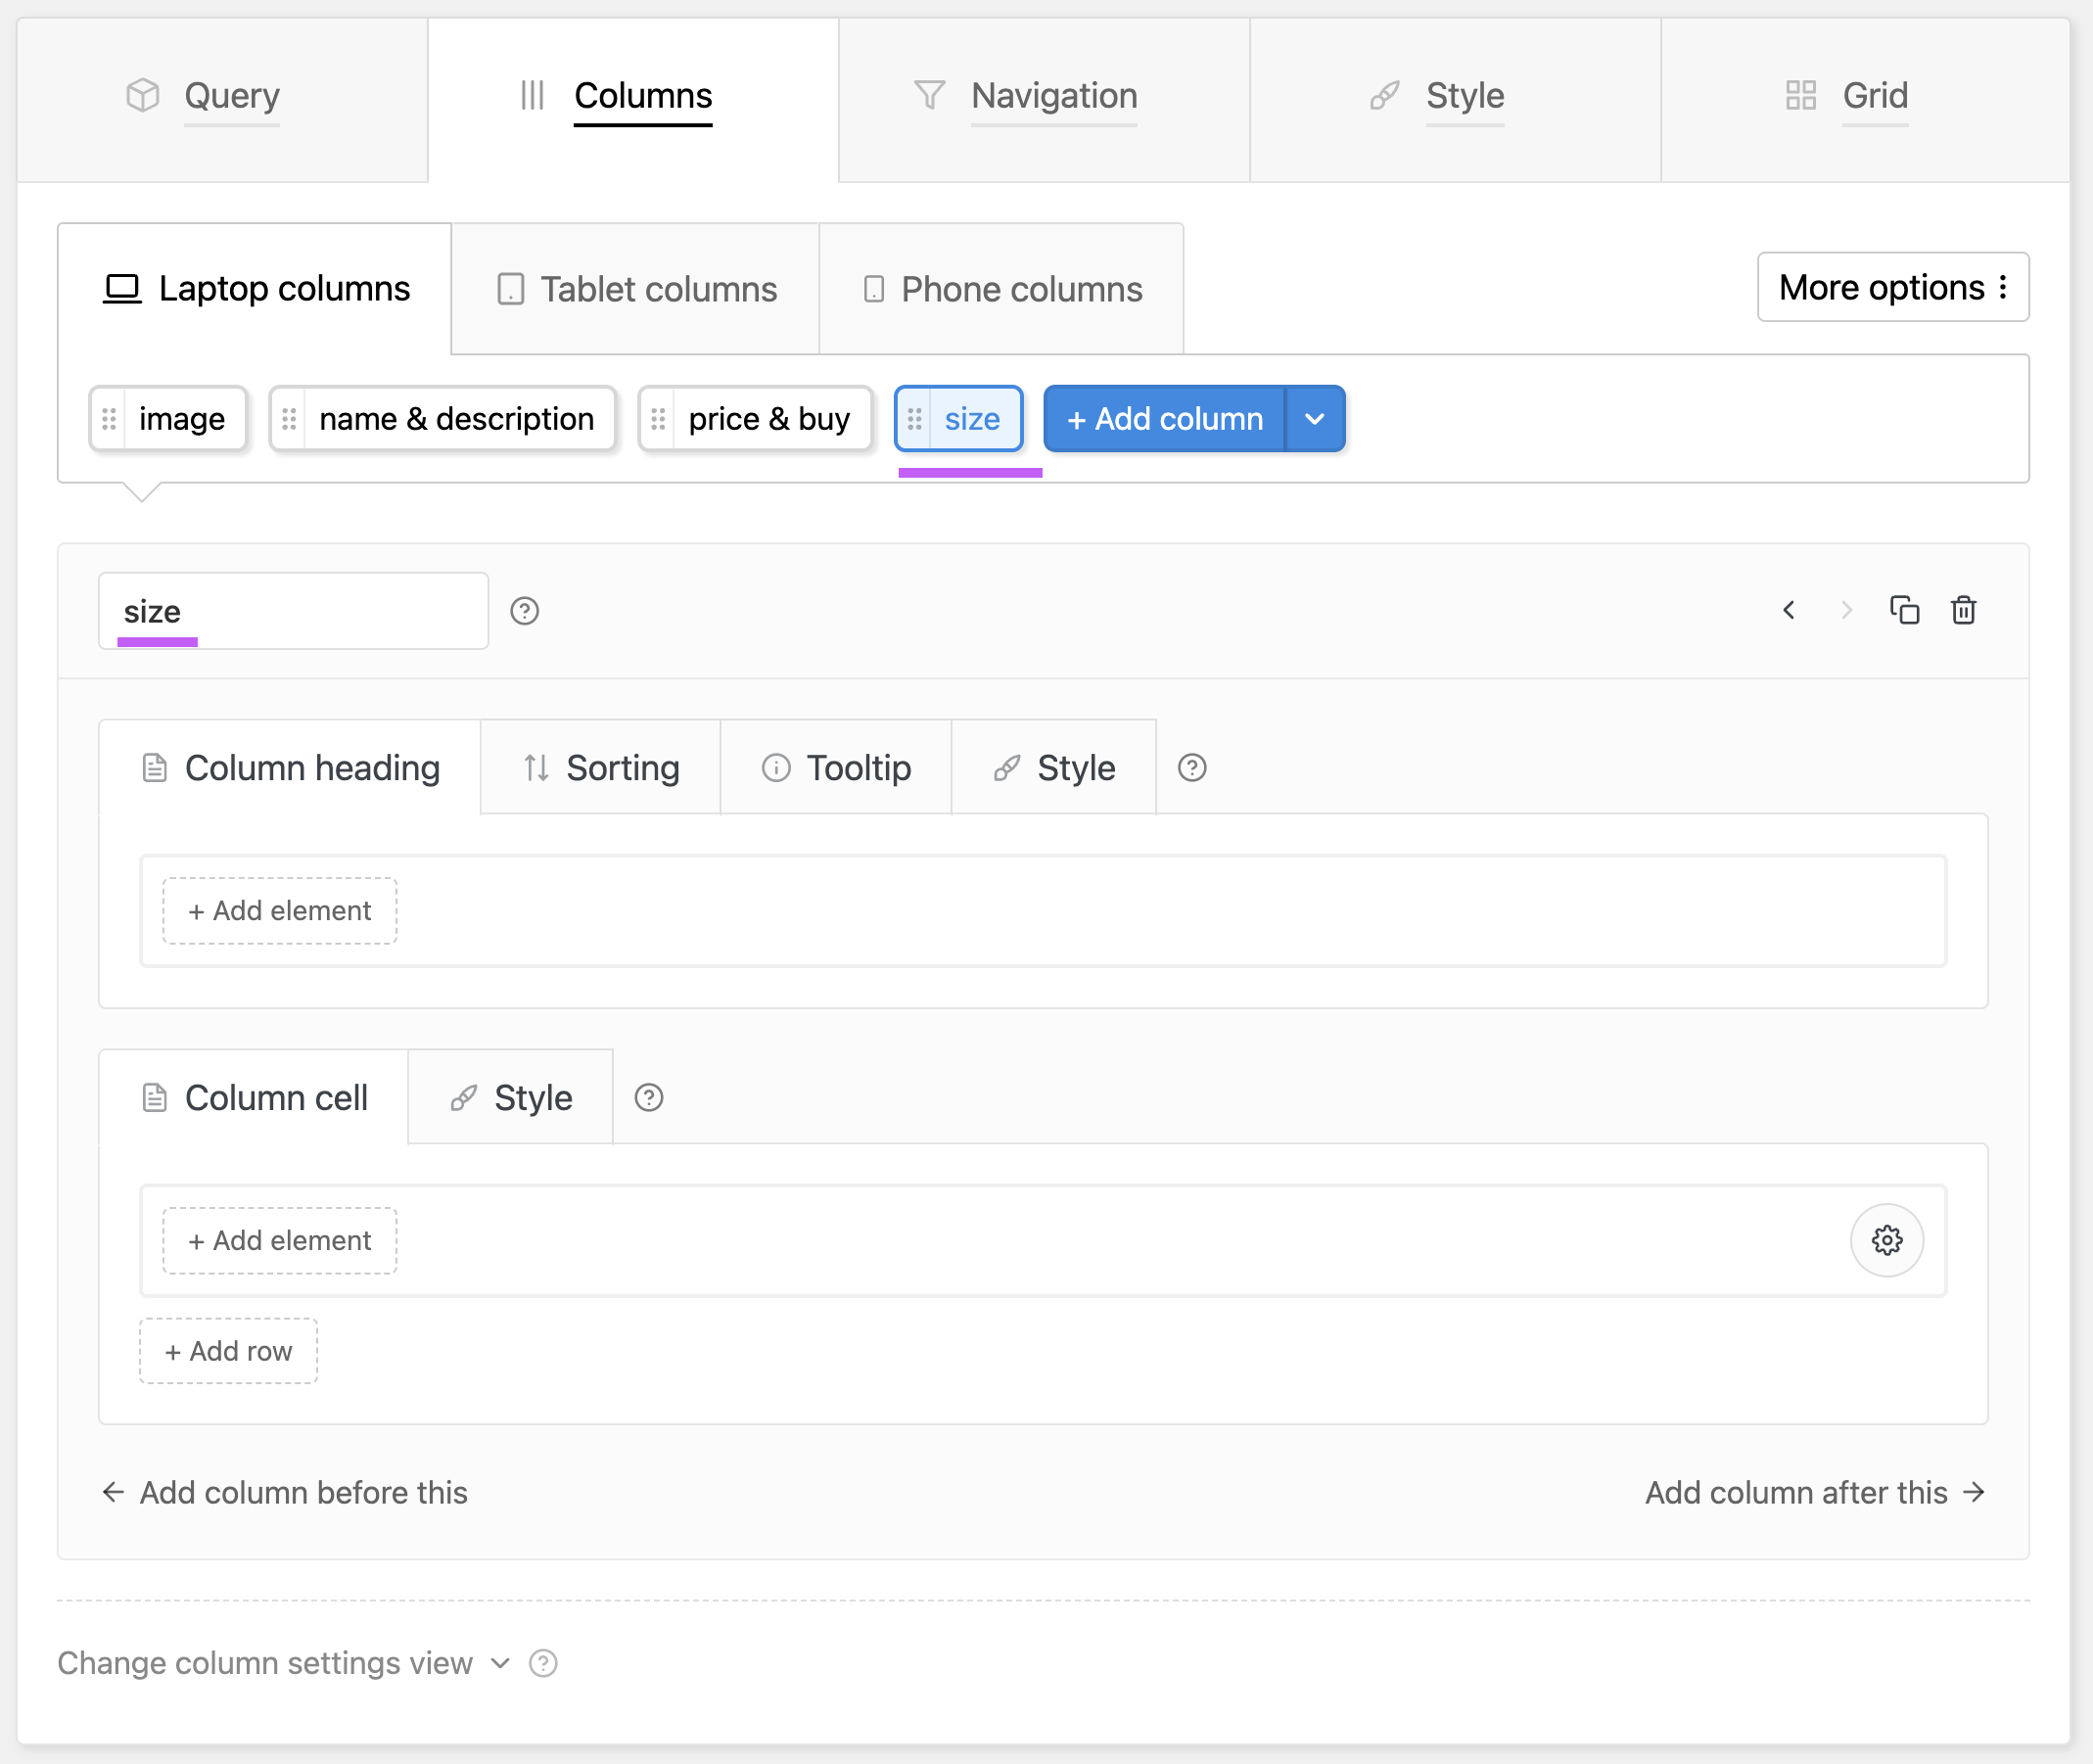
Next, we’ll give this column a text heading. In the ‘Column heading’ tab click the ‘+ Add element’ button.
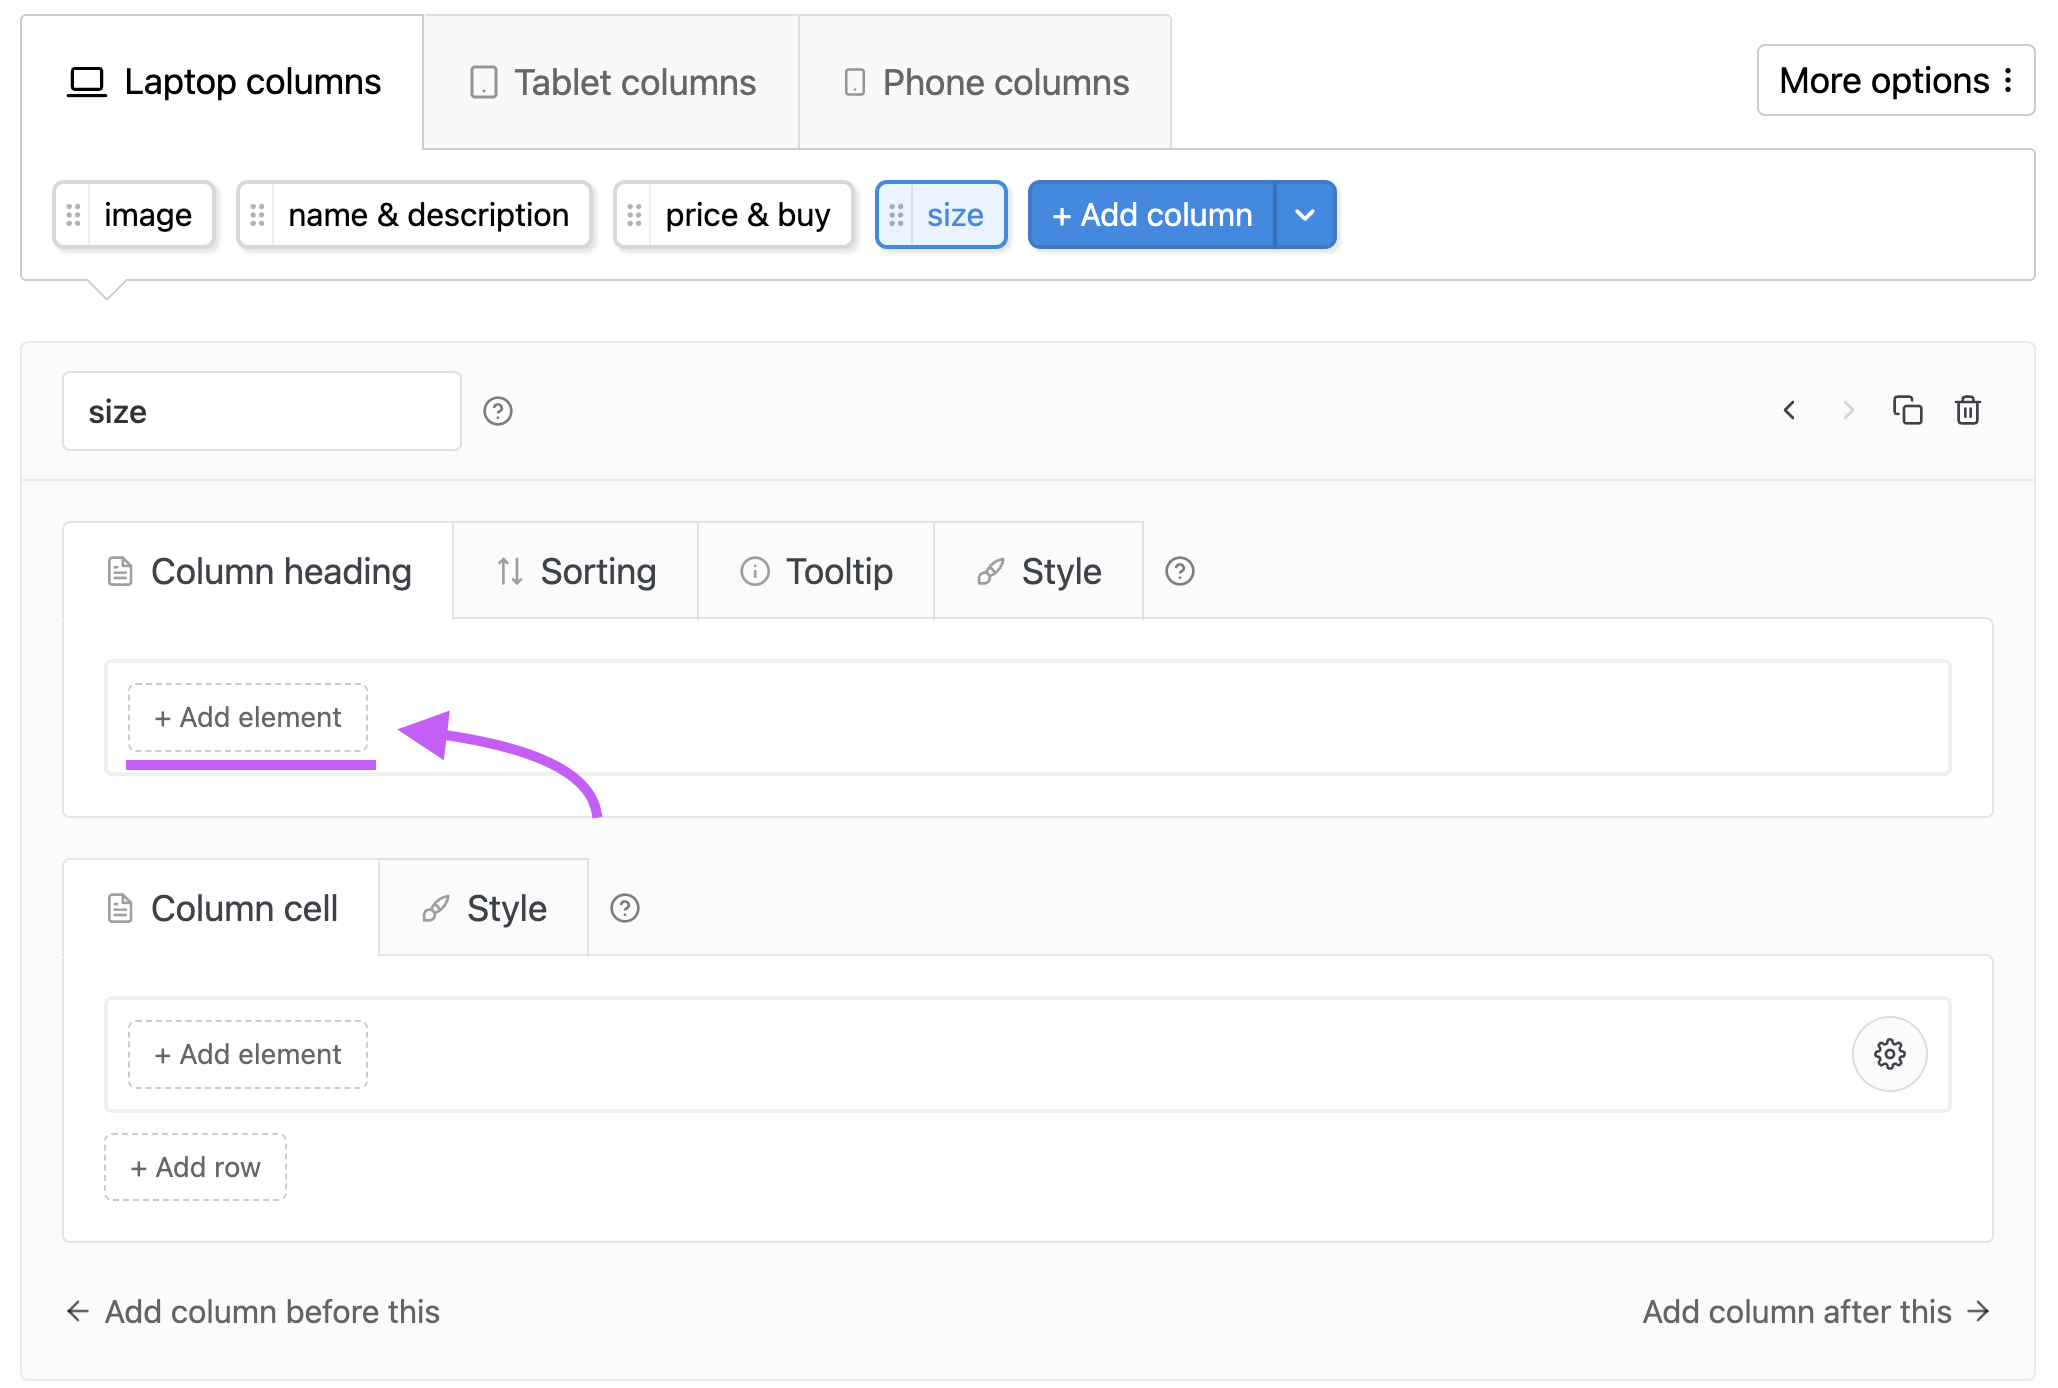
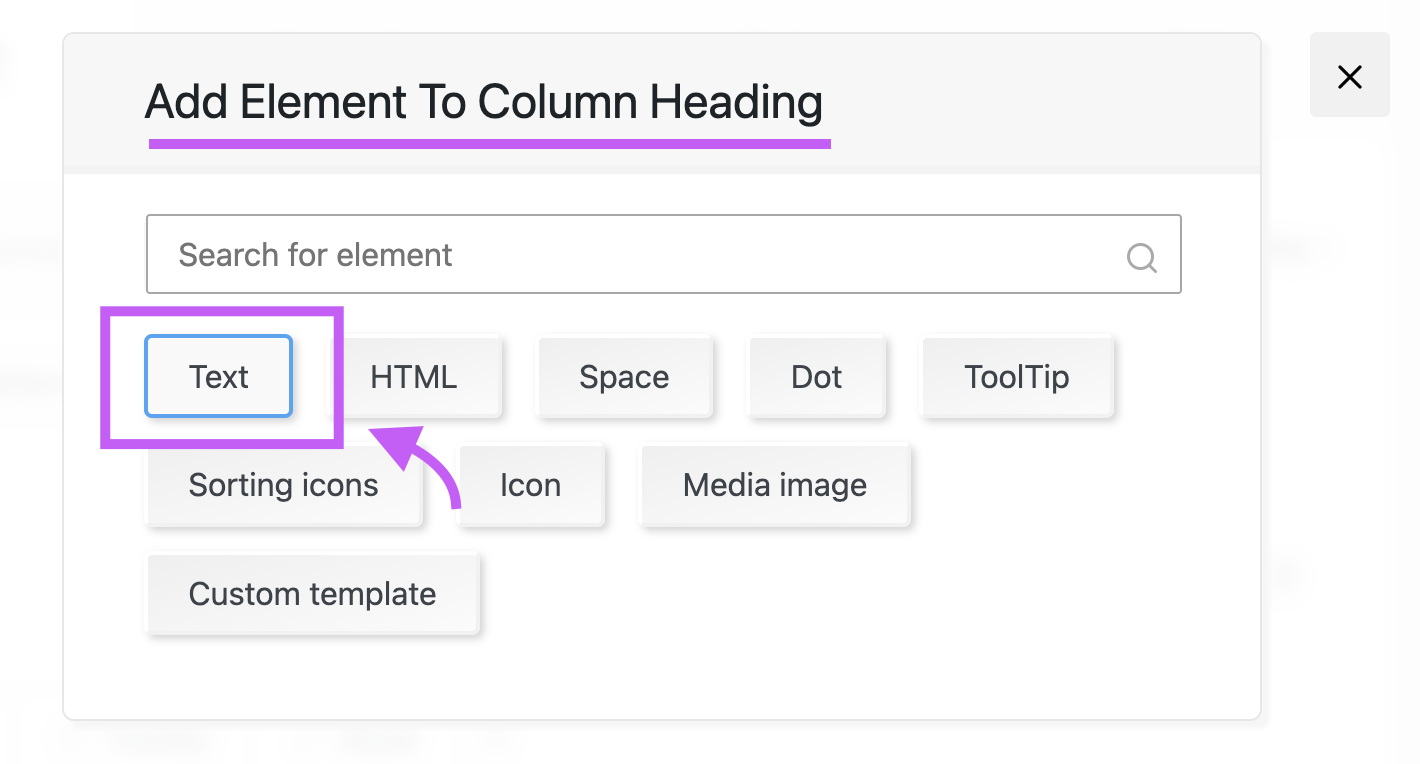
This will open a modal showing you the various elements that you can add to the column heading. Select the ‘Text’ element as we wish to add some text to the column heading.
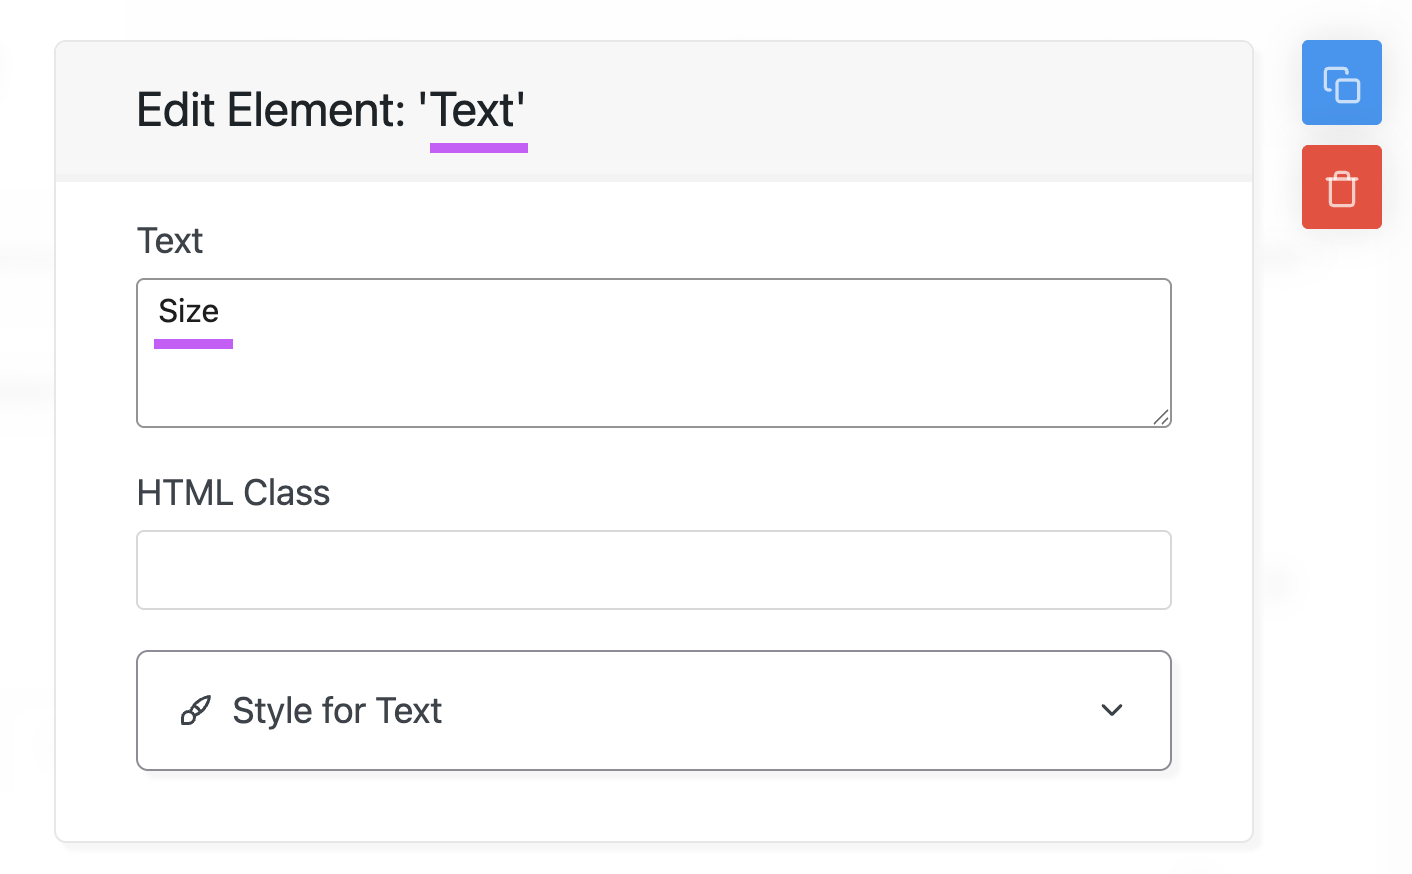
Now the settings of this new Text element will open up. In its ‘Text’ option let’s enter ‘Size’.
Now close this element’s settings by clicking outside of it. You will find that your column now has a text element in the column heading.
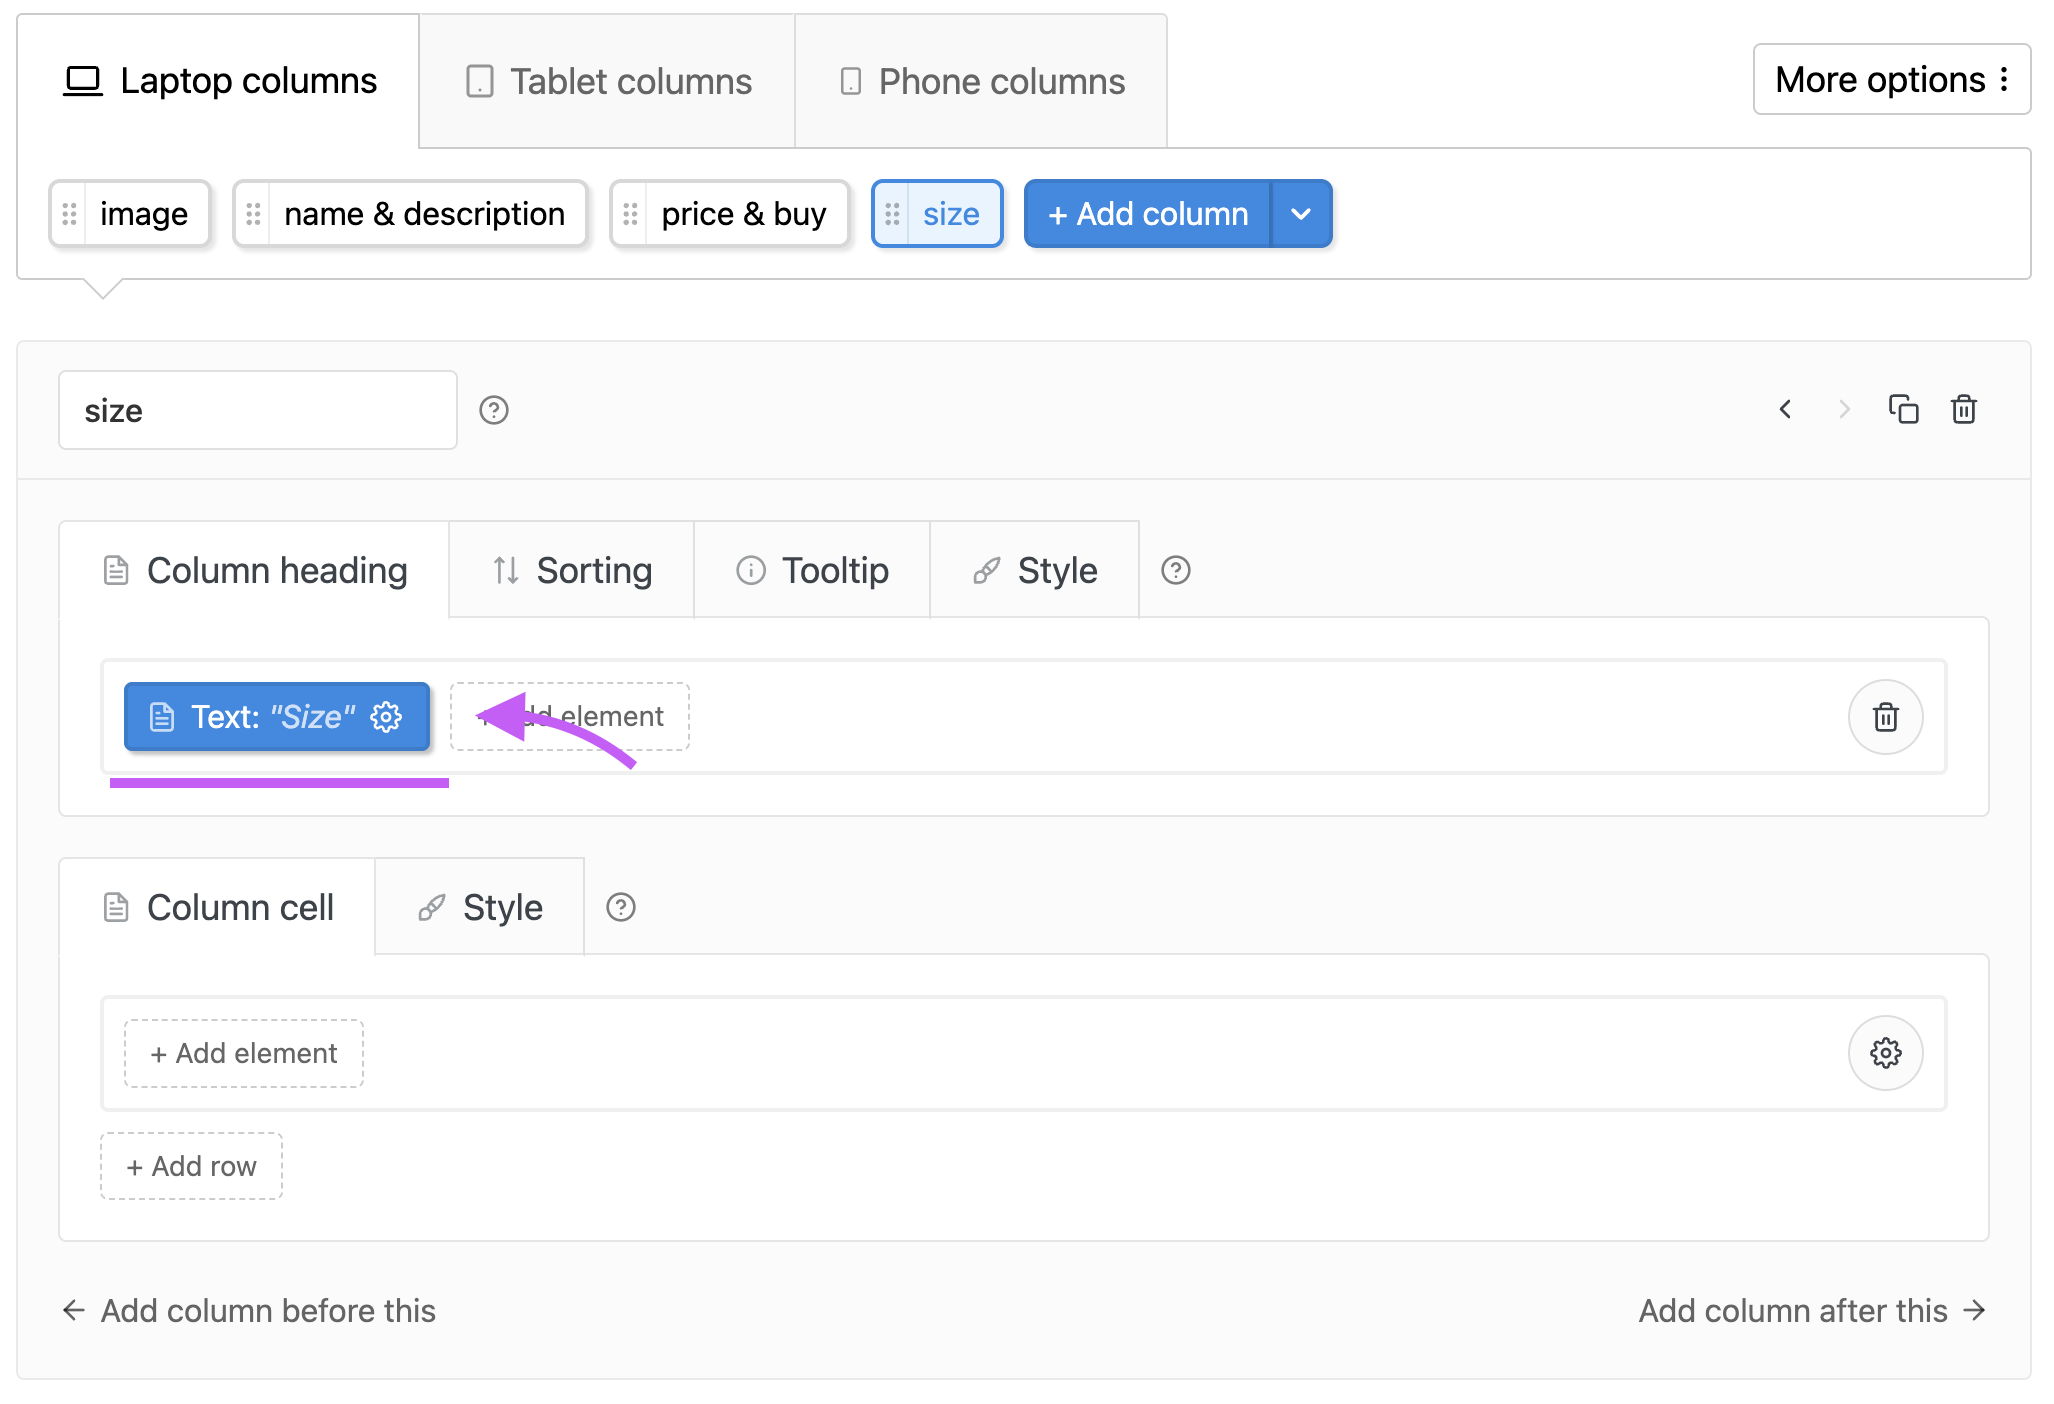
Below the ‘Column heading’ section, you can see the ‘Column cell’ section. The elements that we place here are printed in the sales of the column below the heading cell. Here we wish to show the ‘Size’ attribute for the products.
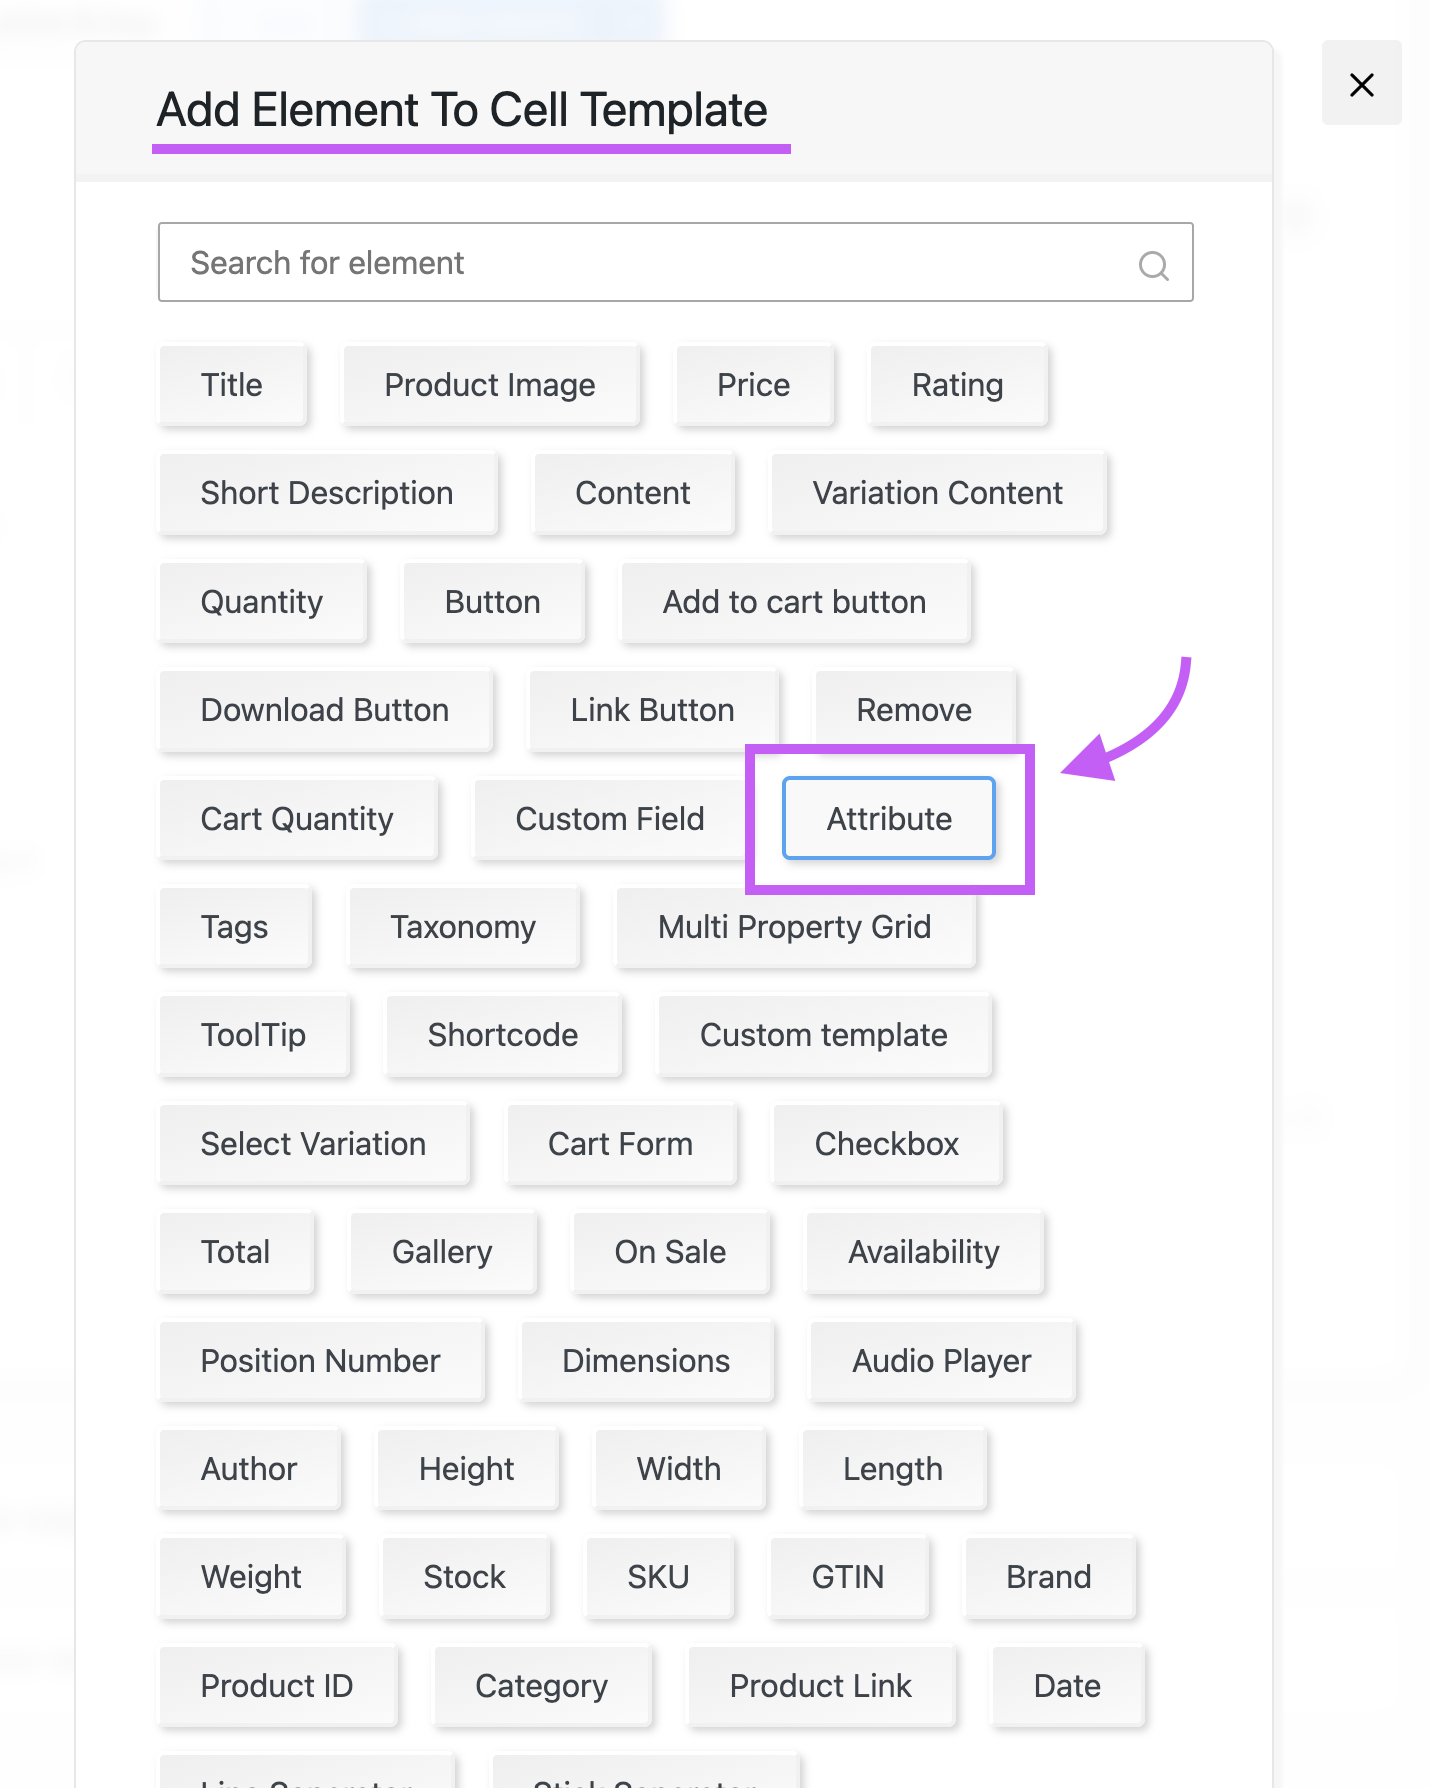
In the ‘Column cell’ tab click the ‘+ Add element’ button. This will open a model that will show you all the elements that we can add to the column cell. Select the ‘Attribute’ element to add it to your column cell.
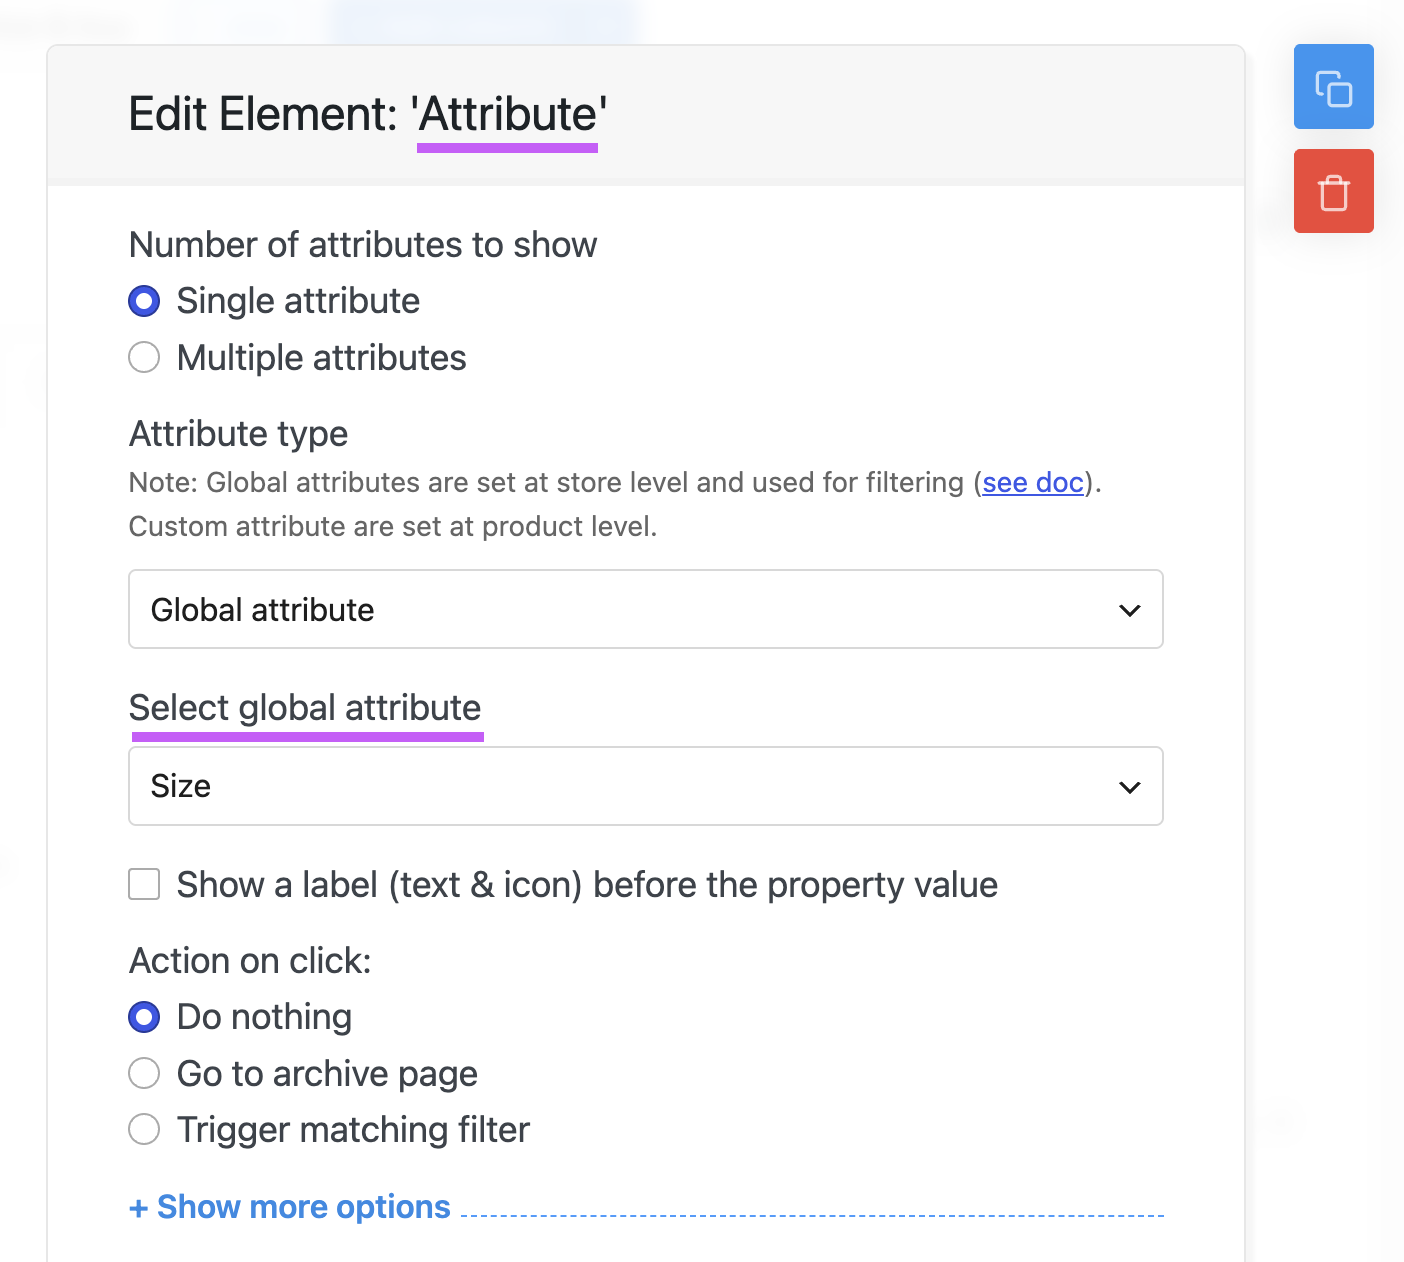
Now the settings of this new ‘Attribute’ element will open up. You will find an option labeled ‘Select global attribute’ with a dropdown below it containing all your woocommerce global attributes as options. We’ll select the ‘Size’ option here.
Then close the attribute element’s settings modal by clicking outside of it. And you’ll find this new element has been added to your ‘Column cell’ section. Our ‘Size’ attribute column is now fully configured, and it will show product sizes in our table on the frontend.
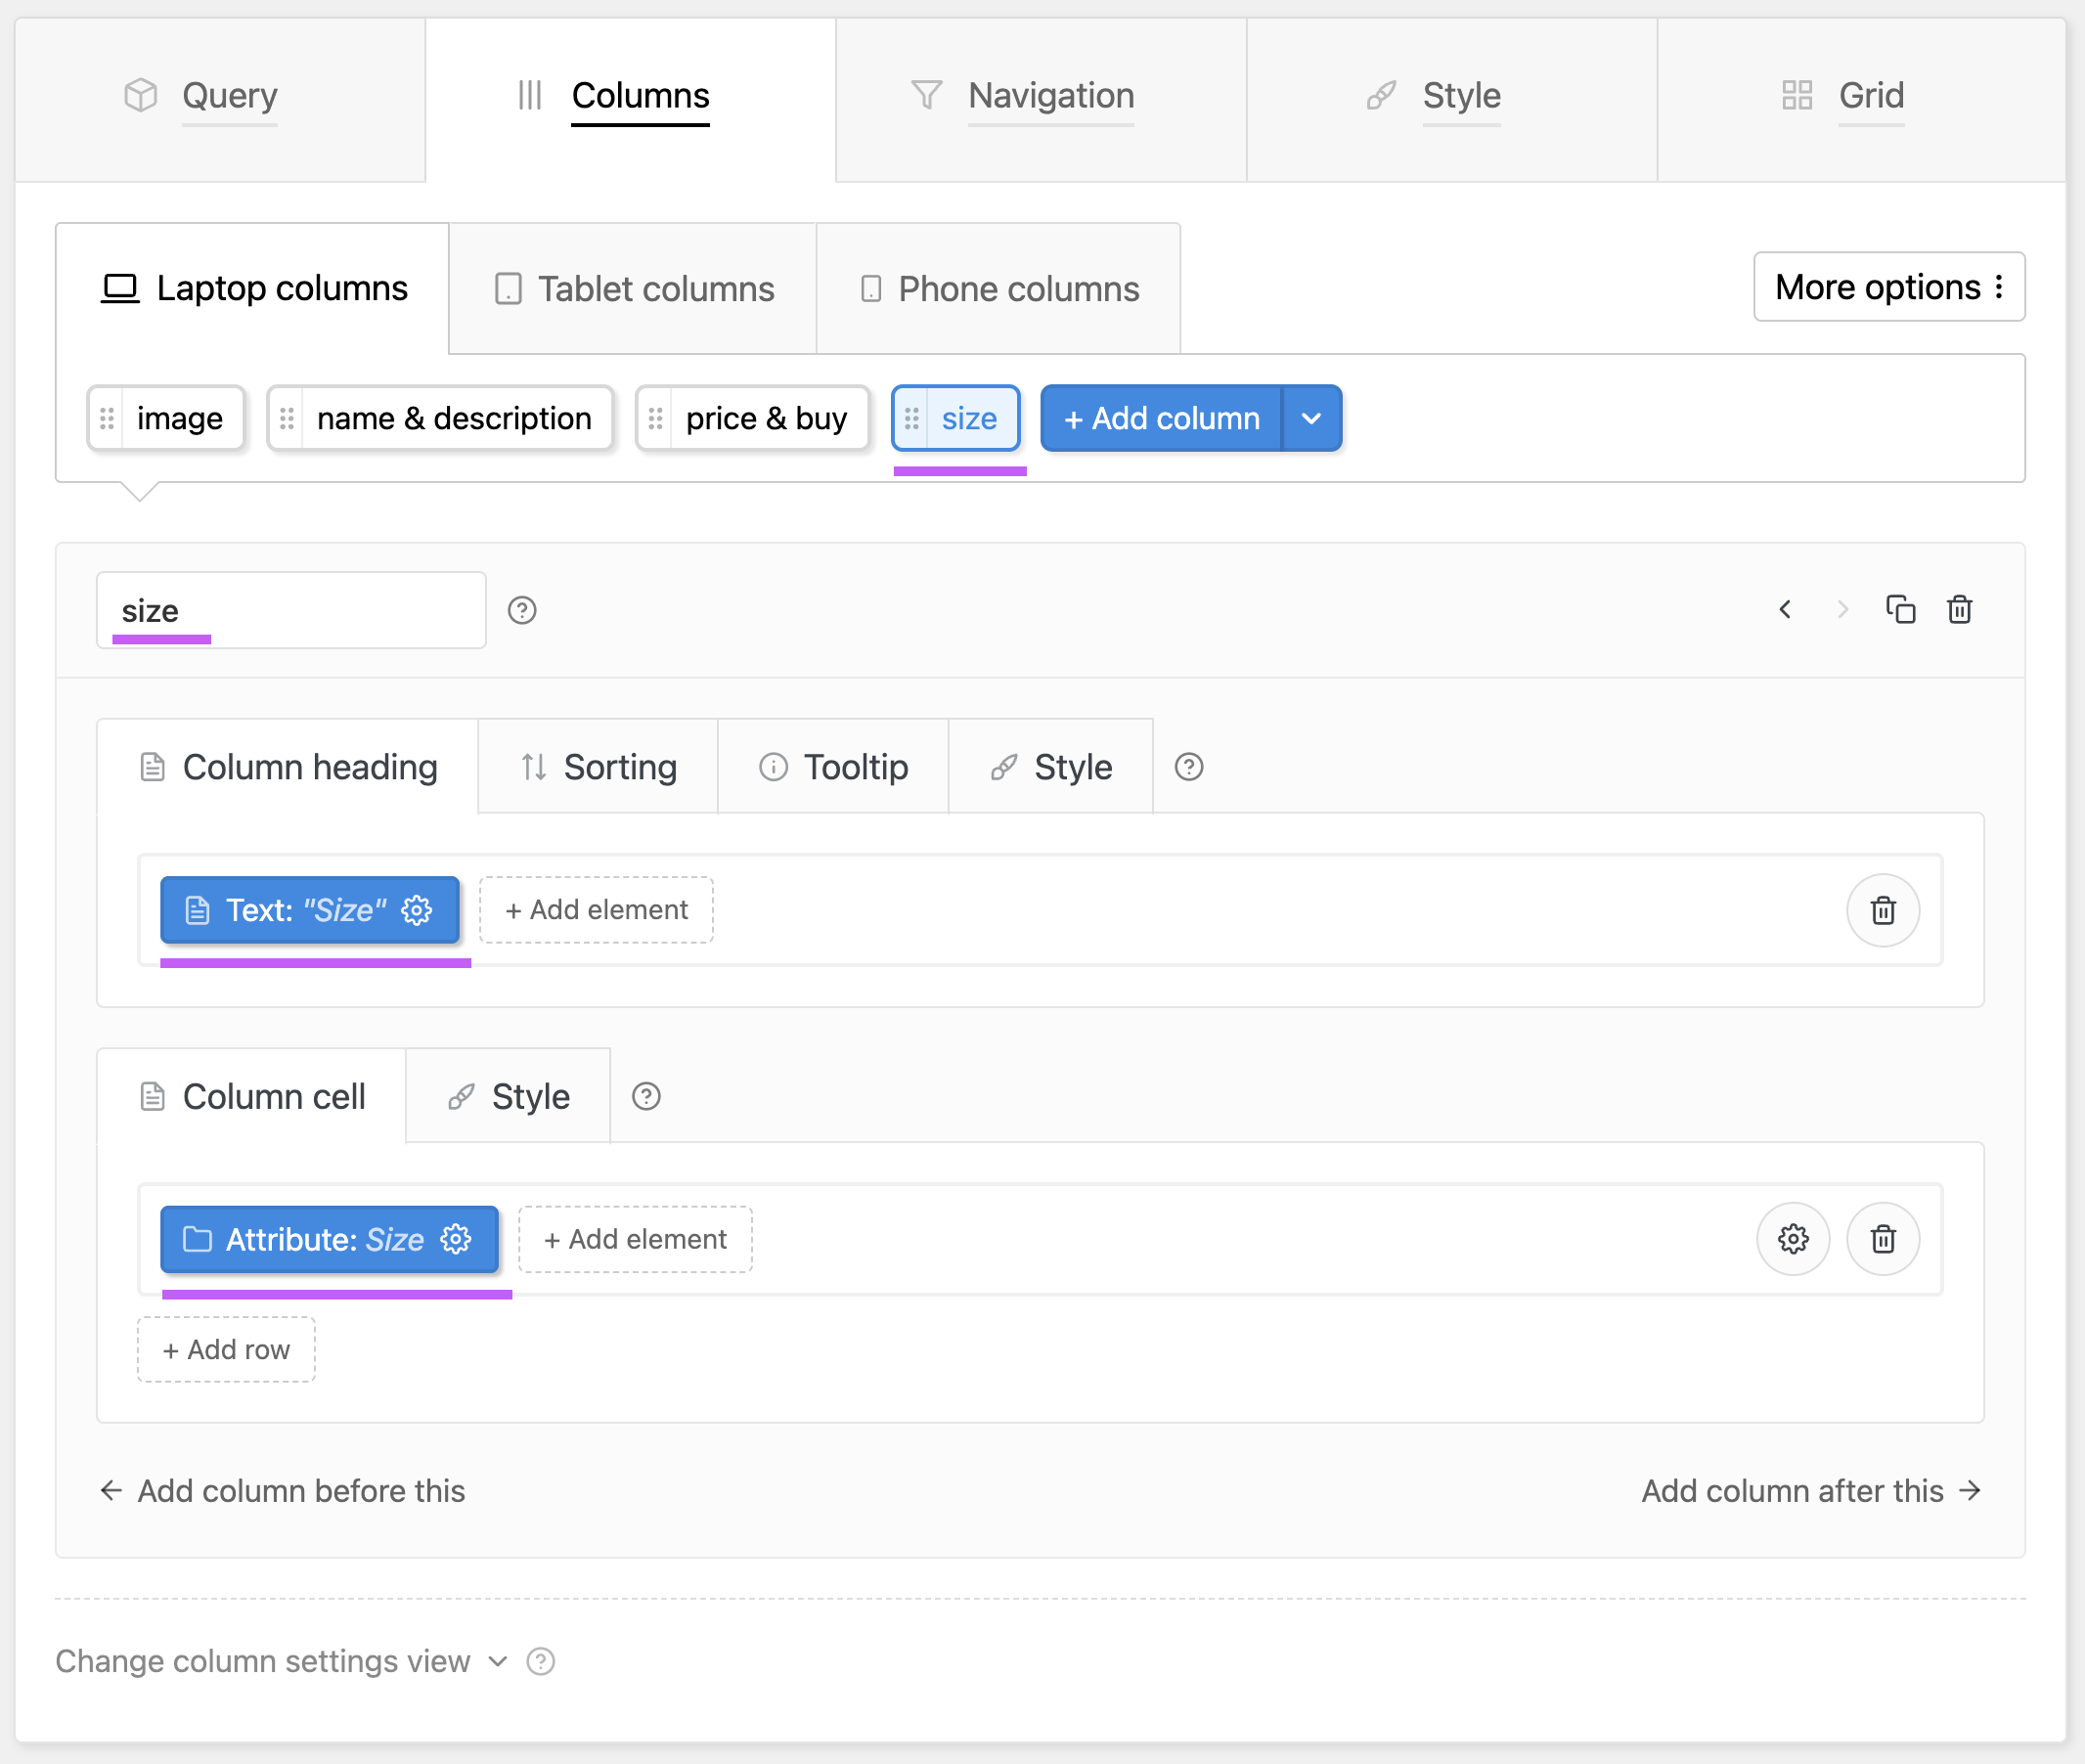
In this way, you can manually create as many attribute columns for your table as you want.