
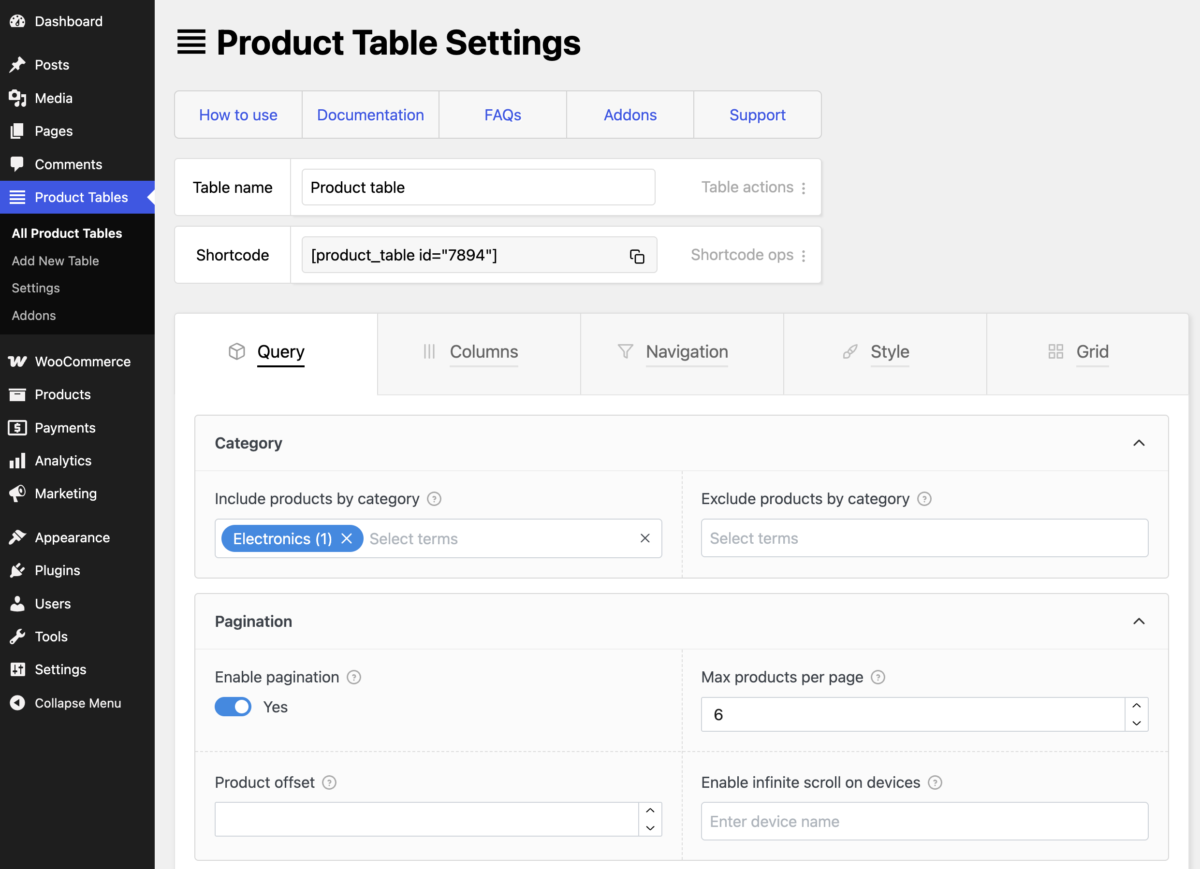
Use this quick reference to edit an existing product table. It covers the most common changes without requiring you to read the full documentation first.
Open the table you want to edit
- In WordPress, go to WP Admin → Product Tables.
- Find the table and click Edit.
- Alternatively, view the table on the front end while logged in as an administrator. You’ll find an Edit table link below the table. Click this link to jump to its editor page. Other site visitors cannot see this link.
- Make your changes and click Save settings. You can also press Cmd + S on Mac or Ctrl + S on Windows.
- Refresh the page on the front end containing the product table to check the result.
The editor is divided into four main tabs:
| Tab | What it controls |
|---|---|
| Query | Which products appear |
| Columns | Which product details appear and how they are arranged |
| Navigation | Search, filters, sorting, pagination and related controls |
| Style | Colors, spacing, borders, fonts and element design |
Note: If you’re using the Grid table view switcher addon plugin, you’ll see a fifth tab titled Grid.
How do I change the table styling?
Use the table’s Style tab when you want to change only this table. Within this tab you’ll find four sub-tabs: Laptop, Tablet, Phone, and Navigation.
Within one of the three device tabs, such as Laptop, open the relevant section you wish to style:
- Odd rows / Even rows for row backgrounds and hover colors.
- Table borders for inner and outer borders and corner roundness.
- Inner elements for common elements such as the title, image, price, quantity and add-to-cart button.
You can also style table columns individually, as well as table elements in the Columns tab. This is helpful if you need a specific column or table element to have unique styling.
The Navigation tab lets you change the styling of navigation elements such as filters, pagination buttons and the sidebar.
Apply the same styling to every table
For site-wide styling, go to WP Admin → Product Tables → Settings → Live Theme Customizer. Select a table or list layout to use as the preview, then click Customize theme. This opens the selected layout with live design controls.
Changes made here become the default theme across your product table and list layouts. For example, you can set the default add-to-cart button background color, table row colors, table-heading cell padding and other shared design settings. This makes it easier to manage the styling of all your layouts from one place.
Table-, column- or element-level styling can override these global defaults. If a global change does not appear in a particular table, clear the corresponding local style setting so the global value can take effect.
How do I change which products the table shows?
Open the Query tab. This controls the starting group of products displayed in the table.
The available criteria include product category, attribute, tag, custom field, SKU, ID, author, product type, availability and other product properties. You can choose to include or exclude products using various criteria.
Most websites need only a couple of genuinely different table or list layouts. Instead of creating a new table every time you want to show a different set of products, create a reusable layout and change the products shown through its shortcode options. This can save considerable setup and maintenance work because future layout changes need to be made in fewer tables.
For example, the same table layout can show different product categories on different pages:
- Clothes:
[product_table id="123" category="clothes"] - Shoes:
[product_table id="123" category="shoes"]
You can also show a specific group of products by ID:
[product_table id="123" ids="111, 222, 333"]Replace 123 with your table ID and use your own category slugs or product IDs. Shortcode options can also modify other query settings and selected table facilities when the layout is printed.
Learn how to reuse a table with shortcode options
How do I change the text in the table?
Every piece of text in the product table can be changed in the table editor. This includes text in column headings, the add-to-cart button label, navigation filter headings and more.
To edit any text in the table, first identify where the text appears.
Text belonging to one table element
Open the element that displays the text:
- Column heading: Open Columns, select the column, then edit the element inside its Column heading area.
- Add to cart button: Open Columns, locate the Button element, then edit its label/text.
- Filter or “Sort by” label: Open Navigation and select that filter or Sort By element. You’ll find options to change text labels in its settings.
- Result count: Open Navigation and select the Result Count element to edit its message templates.
Text shared across tables
Some messages are controlled globally from WP Admin → Product Tables → Settings. Examples include the “No results found” message and floating cart summary text.
The same locations can be used to replace English text with another language. Use a multilingual plugin only when visitors need to switch between multiple languages.
See the full text and translation guide
How do I change the table columns and product information?
Open Columns → Laptop columns.
Add a ready-made column
- Click the dropdown beside + Add column.
- Select a preset column such as Category, Stock, Image or Price.
- Drag the column button to reposition it.
Add a custom column
In most cases, we recommend using ready-made columns as documented above. However, you may wish to create custom columns to take advantage of the plugin’s flexibility and create fine-tuned layouts.
- Click + Add column. This will add a new blank column to your table.
- In the new column’s settings, enter a useful column name that will be used internally by the editor.
- In Column heading, click the + Add element button to add a new Text element and enter the text you want to show in the table heading.
- In the Column cell, click + Add element and choose an element that prints the product information you wish to display.
A single column can contain multiple elements, and you can create nested rows to arrange information within a cell.
Tablet columns
We recommend leaving the Tablet column tab empty. If you don’t create tablet-specific columns for your table, it will simply show the laptop columns on tablet devices.
Phone columns
Open Columns → Phone columns. You can create a separate, simpler arrangement for small screens. Table columns inherit the Laptop columns when the corresponding device section is left empty.
Follow the complete product table tutorial
Read the mobile responsive setup guide
How do I change the navigation filters?
Open the Navigation tab. Navigation elements can be placed in:
- Sidebar — leave it empty if you do not want a sidebar.
- Header above table — useful for search, filters, result count and sorting.
- Responsive navigation — optional phone-specific navigation; if left empty, the plugin automatically adapts the laptop navigation.
To edit navigation:
- Click an existing element to open its settings.
- Change its label, options or behavior.
- Click + Add element to add Search, Sort By, Category Filter, Availability Filter, Price Filter, Clear Filters or another available control.
- Drag elements, rows and columns to arrange them.
- Review other navigation settings such as pagination, adaptive filtering and lazy loading.
- Save and test the filters on the front end, including on a phone-sized screen.
See the navigation UI tutorial